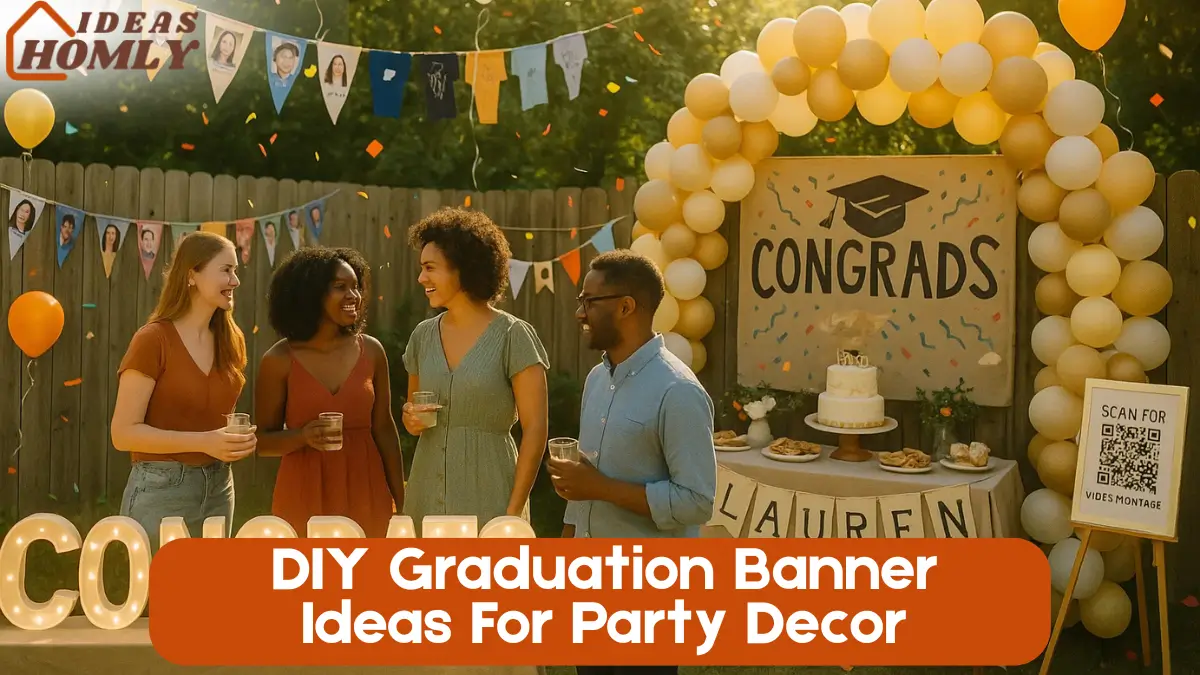
Every graduation party deserves a touch of personality, and nothing makes a celebration more special than a custom DIY banner. I’ve always believed that the best party decorations are the ones that tell a story, and a graduation banner is the perfect way to share that story loud and proud.
Whether it’s a kindergarten milestone or a college degree, these moments deserve thoughtful, creative celebration ideas. That’s exactly why I’m sharing some of my favorite graduation banner ideas that not only look stunning but also hold real meaning.
Each one of these is budget-friendly, DIY-friendly, and guaranteed to impress your guests and of course, they’re perfect for Pinterest-worthy party decor!
Why Personalized Banners Make a Real Difference
I’ve decorated countless graduation parties, and trust me, a personalized banner changes everything.
When guests walk in and see a banner filled with photos, memories, or unique details that reflect the graduate’s journey, it creates an emotional connection.
Instead of using the same generic “Congrats Grad” decor from the store, a DIY banner shows care, effort, and personality. Plus, it becomes a cherished keepsake after the party ends.
Personalized banners:
- Highlight the graduate’s personality
- Reflect memories, achievements, and milestones
- Become great backdrops for photos
- Add visual appeal to your party theme
Whether you’re throwing a backyard graduation bash or an indoor gathering, these ideas will add depth and character to your event.
1. K-12 Photo-Timeline Pennant
This is one of my all-time favorites because it brings the “aww” factor and sparks conversation.
Each pennant in this DIY banner displays a photo of the graduate from each school year, starting from kindergarten all the way to 12th grade. Not only does it show how much they’ve grown, but it also takes everyone on a nostalgic walk down memory lane.
To make it, you’ll need:
- 13 printed school photos
- Sturdy cardstock or felt for the pennants
- String or twine to hang them
- Mini clothespins or hole-punch and ribbon
I love using school-themed scrapbook paper as backing for each photo to give it more personality. You can also add the school grade or year below each image using alphabet stickers or a paint marker.
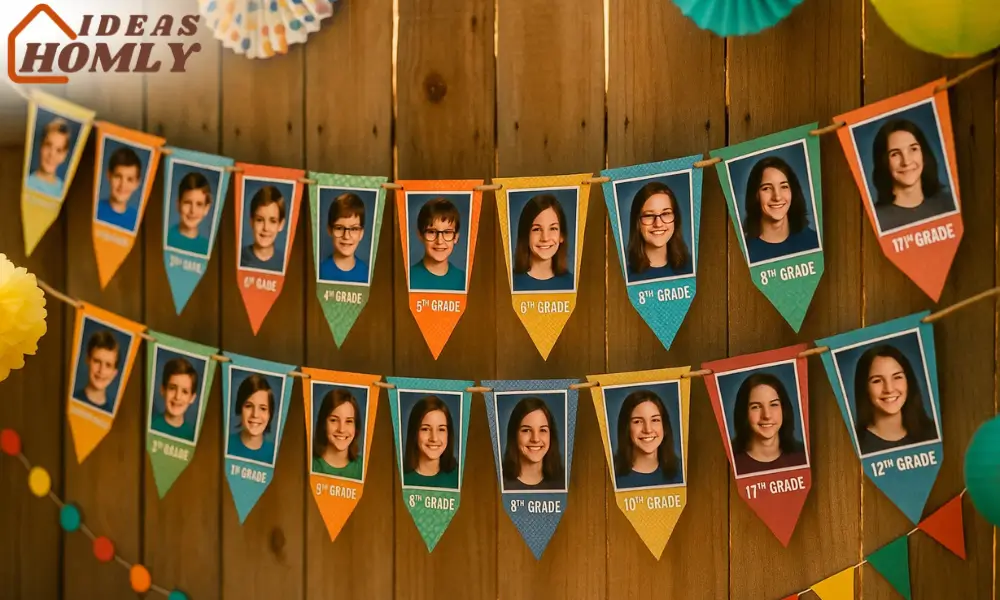
Hang it along a wall, over a dessert table, or on the front porch. It’s simple to make, yet visually stunning and incredibly personal.
This banner idea works beautifully for high school graduates, but you can adapt it for preschool, middle school, or even college by switching the theme or milestones.
2. Hand-Painted Kraft Paper Mural
If you enjoy painting or hand lettering, this idea will let your creativity shine.
Use a roll of kraft paper to create a banner that stretches wide across a wall or fence. What I love about this project is how versatile it is; you can write meaningful quotes, the graduate’s name, favorite subjects, or even hand-draw icons that match their interests.
Here’s what you need:
- Kraft paper roll (brown or white)
- Acrylic paints or paint markers
- Brushes, stencils, or stamps
- Optional: a frame or backdrop stand to hang it
You can also let friends and family add their own messages or doodles. It turns into an interactive decoration and a sentimental gift at the same time.
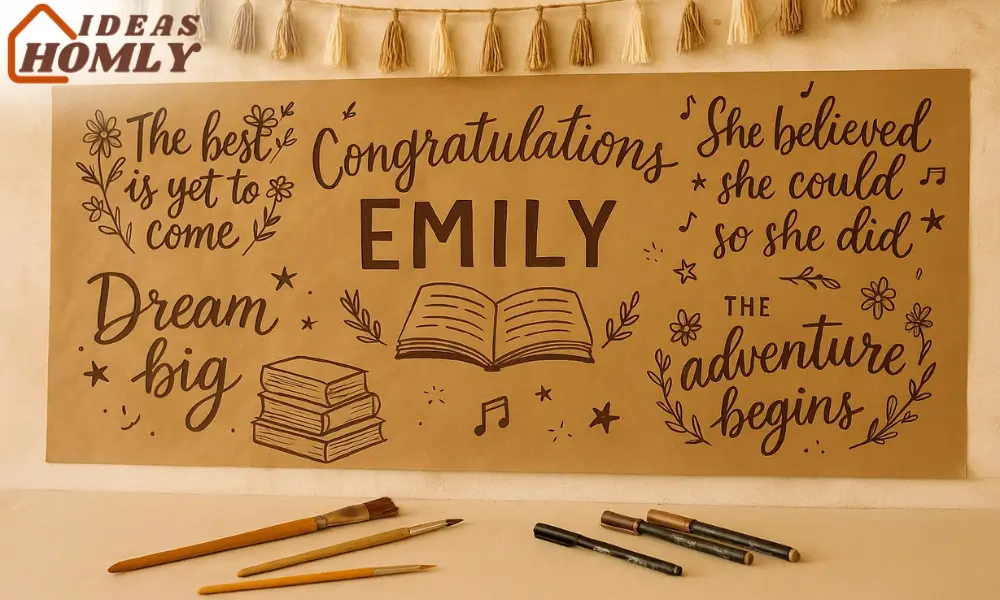
This style of banner is perfect for a rustic or boho-themed graduation party. I once created one with floral borders, and it was the centerpiece of the entire setup.
Don’t worry if you’re not a professional artist, the charm is in the hand-crafted look. You can even use calligraphy-style stencils to help with lettering.
3. LED-Edge Acrylic Letters
For a modern and trendy look, consider a glowing banner made with LED-acrylic letters. While this may sound like a big-budget idea, there are affordable DIY ways to achieve it.
Use clear acrylic sheets or thick transparent plastic to cut out each letter of the graduate’s name or “Congrats 2025.”
What you’ll need:
- Clear acrylic sheets or plastic panels
- LED fairy lights or strip lights
- Glue or adhesive hooks
- Vinyl letters or paint for decoration
Attach the lights along the edges or behind the letters to create a glowing effect. It looks amazing at night, especially for outdoor parties.
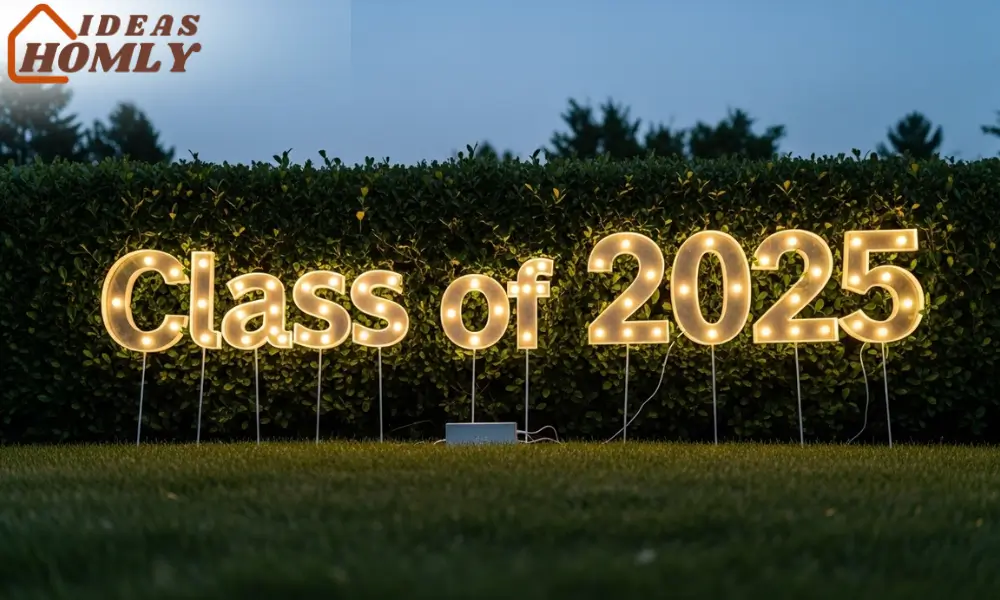
I made one of these for my cousin’s graduation using battery-operated LED strips, and it lit up the entire photo wall. It gave that Instagram-worthy vibe and became the most photographed spot of the party.
This banner idea works well when paired with minimalist or glam party themes.
4. Balloon-Arch + Banner Combo
If you’re aiming for something bold and festive, pairing a DIY graduation banner with a balloon arch delivers a stunning party statement. I’ve used this combo in multiple setups, and it never fails to create a picture-perfect backdrop.
Start by creating a simple banner, this could be a name banner, “Class of 2025,” or a congratulatory message. Then, surround it with a balloon arch in your theme colors.
To make the balloon-arch banner combo, you’ll need:
- Cardstock or vinyl for the banner
- Pre-packed balloon arch kit or balloons in different sizes
- Balloon strip tape and glue dots
- Command hooks or backdrop stand
I recommend placing this setup near the entrance or behind the cake table. It draws attention and naturally becomes a focal point. You can even add small graduation caps, stars, or the graduate’s initials inside some balloons for extra flair.
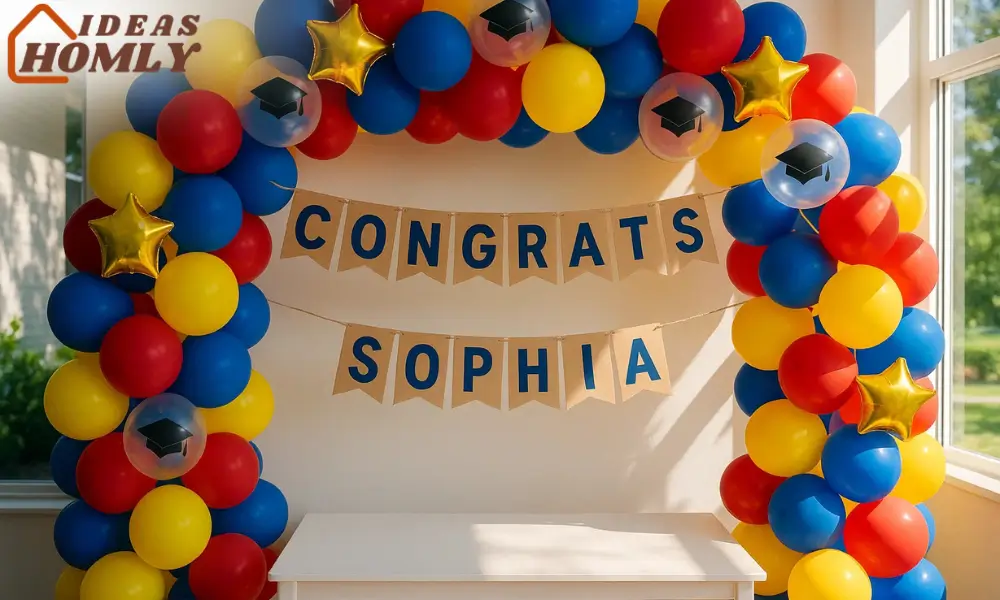
This idea is popular because it mixes classic decor with personal creativity. And best of all, it’s budget-friendly if you DIY the balloon arch with a kit.
5. Double-Sided Vinyl Banner
When I’m decorating for outdoor parties, I always look for durable options that can handle wind, sun, and unexpected weather. That’s where double-sided vinyl banners come in.
This type of banner works especially well for front yard graduation signs, garage wall backdrops, or fence displays. One side can say “Welcome to Sarah’s Graduation,” and the other could feature a custom message or even a photo collage.
Materials I usually use include:
- Printable vinyl or order from a print shop
- High-resolution photos
- Grommets and zip ties for easy hanging
You can design the banner digitally using free tools like Canva. Add elements like school logos, the graduate’s photo, quotes, or future plans (e.g., “Future Nurse, Class of 2025”).
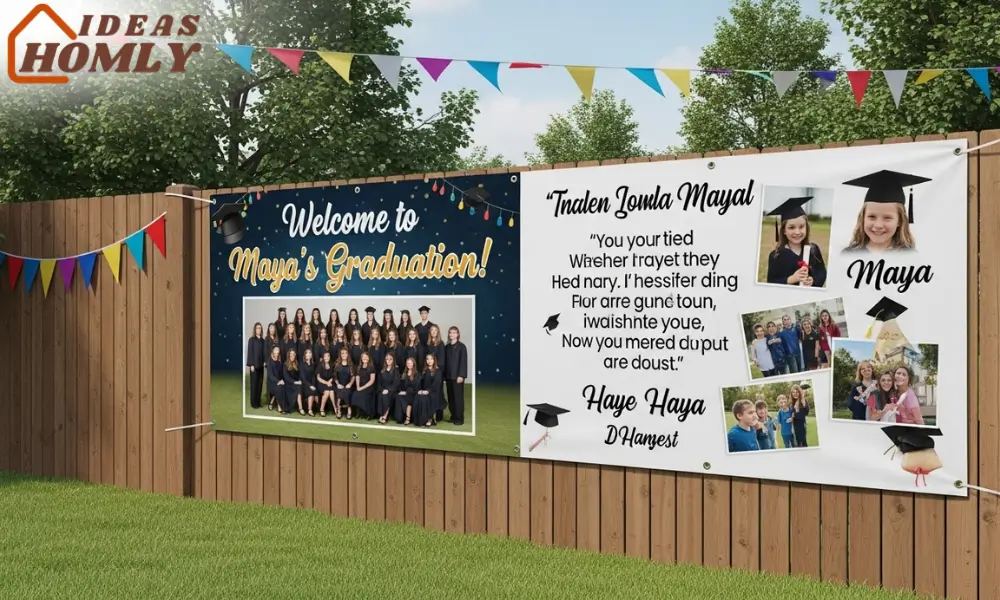
Since it’s double-sided, it offers twice the design space. I once created one that had a fun message on one side and a photo timeline on the other. It was a huge hit.
This type of banner is not only weatherproof but also reusable for open houses or neighborhood drive-by celebrations.
6. QR-Code Linked Video Montage Banner
This idea is perfect if you want to add a tech-savvy, emotional element to your graduation decor. A QR-code banner lets guests scan and watch a personalized video montage on their phones.
I came up with this idea during the pandemic when virtual guests couldn’t attend. But even now, it’s a fun and creative way to add storytelling to your decor.
Here’s how you can make it:
- Create a short video montage of the graduate’s journey (using apps like CapCut or InShot)
- Upload it to a private YouTube link or Google Drive
- Generate a QR code linked to the video (you can use free QR generators)
- Print the code on a banner with a message like “Scan to see the journey”
Design the banner with a clear headline, the QR code in the center, and optional decorations like stars, quotes, or the graduate’s name.

This banner can hang at the entrance or near the guestbook. I like adding a small instruction below the QR code: “Scan to watch the highlights of [Name]’s Graduation Journey.”
It’s interactive, touching, and very unique. Plus, it’s great for grandparents or family who want to relive the memories later.
7. Upcycled T-Shirt Fabric Bunting
Sustainable, sentimental, and incredibly charming this banner idea is perfect for those who want to reuse old clothes in a meaningful way.
You’ll need old school t-shirts, team jerseys, or even favorite shirts your grad no longer wears. Cut them into triangular or rectangular shapes to create fabric bunting pieces.
Materials you’ll need:
- Old t-shirts or fabric scraps
- Scissors, fabric glue, or a sewing machine
- Twine or ribbon to string the bunting
- Optional: fabric paint or iron-on letters
I love this idea because each fabric piece holds a memory, like the shirt from a sports game, a school event, or even a vacation. It’s like stitching together their past into one creative banner.
This works beautifully for backyard parties, giving off a warm, handmade look. You can even ask family members to contribute a piece of fabric to make it a group effort.
It’s easy to hang, lightweight, and becomes a decor piece your graduate will treasure for years.
Tips for Printing, Hanging & Customizing Your Banner
After choosing your favorite banner idea, the next step is to make it look polished and party-ready. I always recommend planning where your banner will hang before you start designing.
Here are my go-to tips for a perfect display:
Printing Tips:
- For photo-based banners, use high-resolution images
- Choose weather-resistant materials like vinyl or laminated cardstock for outdoor use
- Print in matte finish to avoid glare in photos
Hanging Tips:
- Use command hooks for indoor walls to avoid damage
- Zip ties or string work best for fences and backyard setups
- Consider using a banner stand for freestanding display
Customization Ideas:
- Add the graduate’s name, class year, and school logo
- Incorporate personal quotes or inside jokes
- Match the color palette to your party theme for a cohesive look
No matter which banner style you choose, the goal is to reflect your graduate’s story with pride and personality.
Conclusion
As someone who’s spent years styling DIY decor and celebrating life’s big milestones, I know how important it is to make graduation feel personal. These banner ideas aren’t just about decoration they’re about honoring growth, memories, and the journey that brought your graduate here.
Whether you pick a nostalgic photo-timeline, a glowing LED display, or a sustainable fabric bunting, each banner has the power to make your party feel extra special.
And the best part? You don’t need a massive budget or professional tools. Just creativity, some simple materials, and a love for celebrating the people who matter most.
Choose the style that fits your graduate’s personality, and let the banner become the heart of your celebration. I promise, it’ll be one of the first things your guests notice and one of the last things they forget.
FAQs
I recommend starting at least 2 to 3 weeks in advance. This gives you time to gather materials, print photos, and make adjustments. If you’re using online printing services or ordering supplies, factor in shipping time too.
The ideal size depends on where you plan to hang it. For indoor wall banners, 2 ft by 4 ft works well. For outdoor fences or backdrops, go for 3 ft by 6 ft or even larger. Make sure the text and photos are readable from a distance.
Absolutely. I often use Canva, Adobe Express, or PicMonkey to design banner layouts. They have graduation templates, and you can easily customize fonts, colors, and images. Once done, export in high resolution for printing.
The Photo-Timeline Pennant is the most beginner-friendly. It only requires printed photos, cardstock, string, and clothespins. No design software or cutting tools needed. It looks beautiful and creates instant nostalgia.
Use vinyl material, laminated paper, or waterproof sprays. If using regular paper, laminate each section. Secure with grommets and zip ties to prevent damage from wind or rain. I always advise testing it a day before the event.
Yes, and it can actually enhance your decor! For example, you can pair a QR-code banner near the guestbook with a balloon arch banner at the photo booth. Just stick to a common theme or color palette so it all feels cohesive.