Every October, I notice that nail art takes a spooky turn, and honestly, it’s one of my favorite parts of the season. Halloween nails in 2025 are all about mixing eerie charm with fashion-forward details.
Whether you’re into gothic glam or cute pumpkin vibes, there’s a design waiting to match your costume or even steal the show.
The best Halloween manicure ideas don’t just scream spooky; they also feel wearable and classy. I’ve been scrolling through trends, salon feeds, and even nail tech groups to find the most eye-catching looks people are loving this year.
From glossy cherry tones to cobweb chrome, these designs will make your hands the main attraction at every Halloween event.
Let’s get into some of the most creative and doable Halloween nail looks I’ve seen (and yes, totally saving some of these for my next salon visit).
1. Dark Cherry Luxe Nails
If vampires had a signature manicure, it would be this one. Dark cherry nails are the perfect blend of gothic elegance and timeless style. The shade is rich, deep, and just dark enough to feel mysterious without looking harsh.
What I like about this trend is how adaptable it is. You can go for a glossy finish for a sleek, polished look or add a matte top coat for a more vintage vibe.
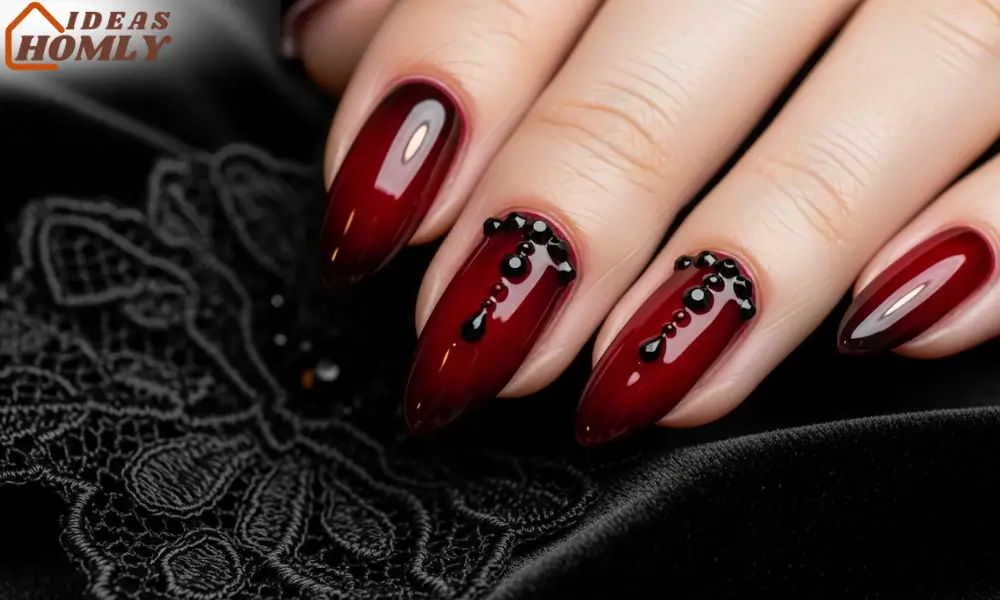
Some people even add a subtle chrome glaze or tiny black rhinestones to give the illusion of dripping blood. It’s creepy but make it fashion.
If you prefer at-home manicures, use a wine-red gel polish with a base of jet-black near the cuticle. It gives dimension and makes the nails look almost like gemstones under candlelight.
This design pairs beautifully with gothic dresses, velvet outfits, or anything with lace and dark florals.
| Quick Tip | Why It Works |
|---|---|
| Use two coats of deep red with a glossy top coat | Adds depth and luxury to the color |
| Add micro black gems near tips | Creates subtle Halloween sparkle |
| Try almond or coffin shape | Enhances the dramatic effect |
2. Micro-French Slime Tip
French tips are a classic, but Halloween 2025 gave them a gooey twist. Instead of the usual white line, nail artists are painting slime-green tips that drip slightly down the nail. It’s playful, weirdly satisfying, and still looks chic enough for everyday wear.
This design caught my eye because it doesn’t scream horror; it whispers it. The base is a neutral nude or sheer pink, which makes the bright green pop.
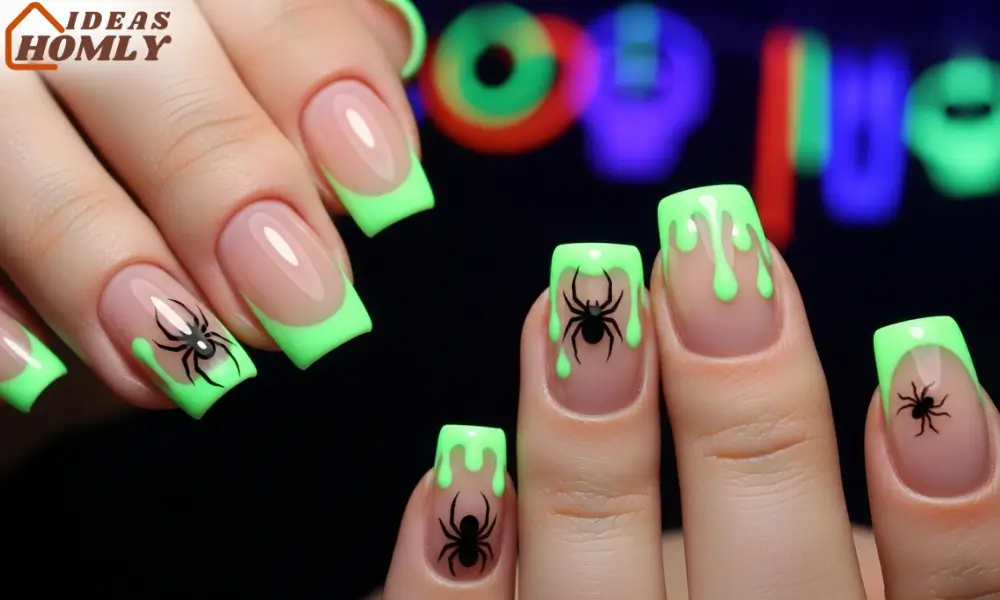
For an extra Halloween touch, you can add tiny black spiders or dripping effects using nail art pens.
I’ve seen people pair this manicure with lime accessories or neon accents in their outfits, which makes it even more fun. If you’re trying to keep your nails subtle yet festive for work or school, this one hits the perfect middle ground.
Nail Pro Tip: Go for UV-reactive polish so your green tips glow under black light. Perfect for parties.
3. Chrome Cobweb Nails
This one is pure Halloween magic. Chrome cobweb nails combine shine, art, and just the right amount of creepiness. The idea is simple: a metallic base coat (think silver, pewter, or gunmetal) with hand-painted cobwebs using black gel polish or stamping plates.
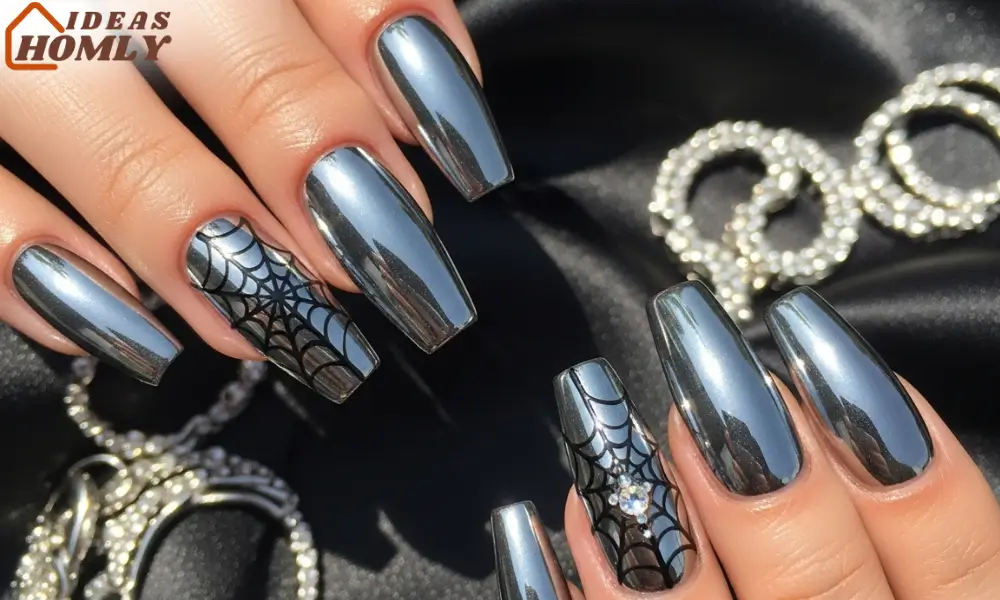
I first saw this trend on a nail artist’s Instagram in Seoul, and it immediately blew up because it looks futuristic yet haunting. The chrome finish reflects light beautifully, making the cobwebs appear almost 3D.
If you’re going for a more subtle effect, you can switch the colors, black base with silver chrome webs. It’s ideal for short nails too since the web pattern elongates the shape visually.
What You’ll Need:
- Chrome powder or metallic gel polish
- Thin nail art brush or web stencil
- Non-wipe top coat for mirror finish
You can even take it up a notch by adding a tiny crystal “spider” gem at the corner of the web. It’s a small detail, but it makes the manicure unforgettable.
4. Aura Pumpkin Glow Effect
I’ve always been fascinated by aura nails, and when I saw the pumpkin glow version trending this year, I knew it had to be on this list.
Imagine a soft gradient that fades from warm pumpkin orange in the center to translucent or nude edges, like your nails are softly glowing.
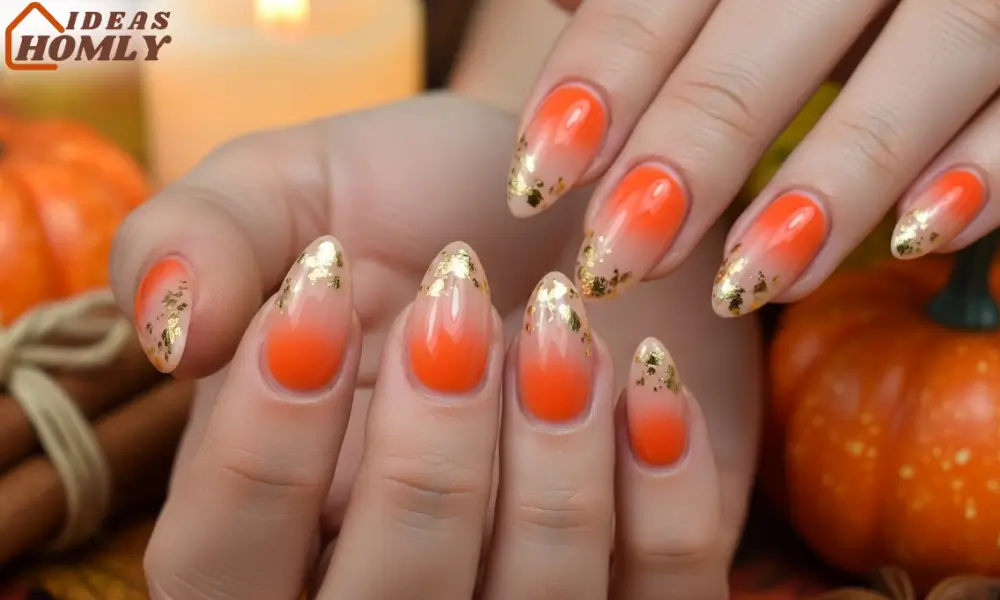
This look combines Halloween color themes with the “aura energy” nail trend that took over TikTok earlier this year. It’s subtle, elegant, and surprisingly easy to do with the right sponge or airbrush tool.
To make it extra Halloween-appropriate, you can layer a thin shimmer coat or tiny gold foil accents. It gives the nails a warm candlelight effect that feels cozy yet festive.
Styling Tip: Pair these nails with gold rings or autumn-toned outfits. The orange aura complements earthy colors beautifully.
| Product Type | Recommended Tone |
|---|---|
| Base polish | Nude beige or sheer pink |
| Center color | Soft pumpkin orange |
| Accent | Gold foil or shimmer dust |
5. Milk-Bath Ghost Nails
I never thought something as eerie as a ghost could look this soft, but the milk-bath ghost trend proved me wrong. This look combines milky-white translucent polish with tiny ghost figures floating inside the layers. It gives a dreamy, fog-like effect, spooky but still very chic.
The best part? It’s surprisingly easy to DIY. All you need is a milky base coat, white gel polish for the ghosts, and a dotting tool or fine brush.
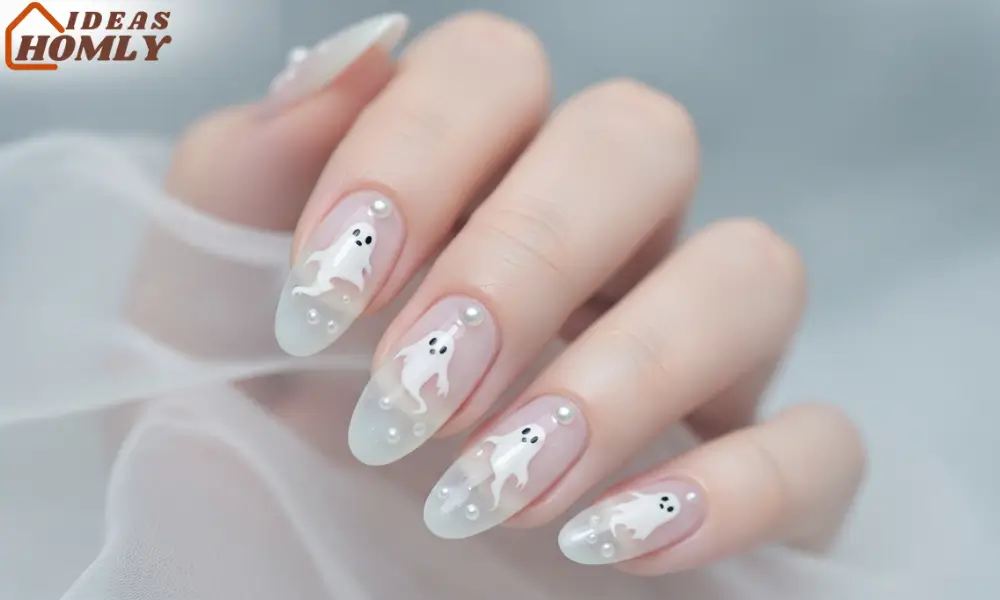
I prefer painting one or two minimalist ghosts per hand rather than covering every nail; it keeps things classy and modern.
If you visit a salon, ask your artist to layer the ghosts within the polish so they appear as if they’re floating under a soft mist. Pair this look with sheer glitter or tiny pearl accents for an ethereal Halloween manicure that feels otherworldly but wearable all season.
| Style Element | Effect |
|---|---|
| Milky sheer base | Creates ghostly, floating depth |
| Minimal ghost art | Keeps the nails elegant and trendy |
| Tiny pearl details | Adds soft shimmer and dimension |
6. Cat-Eye Hematite Nails
If Halloween had a gemstone, it would probably be hematite: dark, reflective, and mysterious. Cat-eye hematite nails use magnetic polish to create that hypnotic shifting line of light that moves as your fingers turn. I first saw this effect in a salon video and instantly booked an appointment.
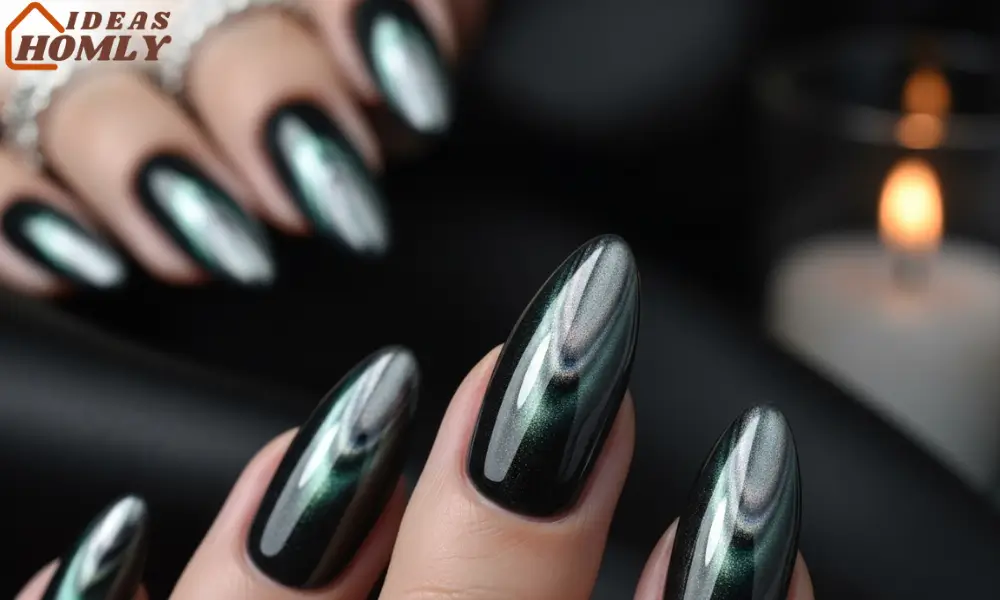
To achieve this, a magnetic cat-eye gel polish is used, usually in shades of black, gunmetal, or deep emerald.
When you hold the magnet over it, the metallic pigments align to create that glowing “cat-eye” flash. It gives the nails an almost spell-like appearance.
What makes it so ideal for Halloween is how it mimics magical energy or an enchanted stone. You can also add a matte top coat to soften the shine or apply glossy for a more high-impact, mirror-like look. Either way, it’s the kind of manicure that people notice immediately.
Pro Tip: Pair this with silver rings or claw-shaped nail extensions for extra drama.
7. Molten Metal Drip Nails
Every year I see a few designs that make me stop scrolling—this was one of them. Molten metal drip nails look like liquid silver or copper is melting off your fingertips. They’re edgy, reflective, and perfect for Halloween parties where you want something bold.
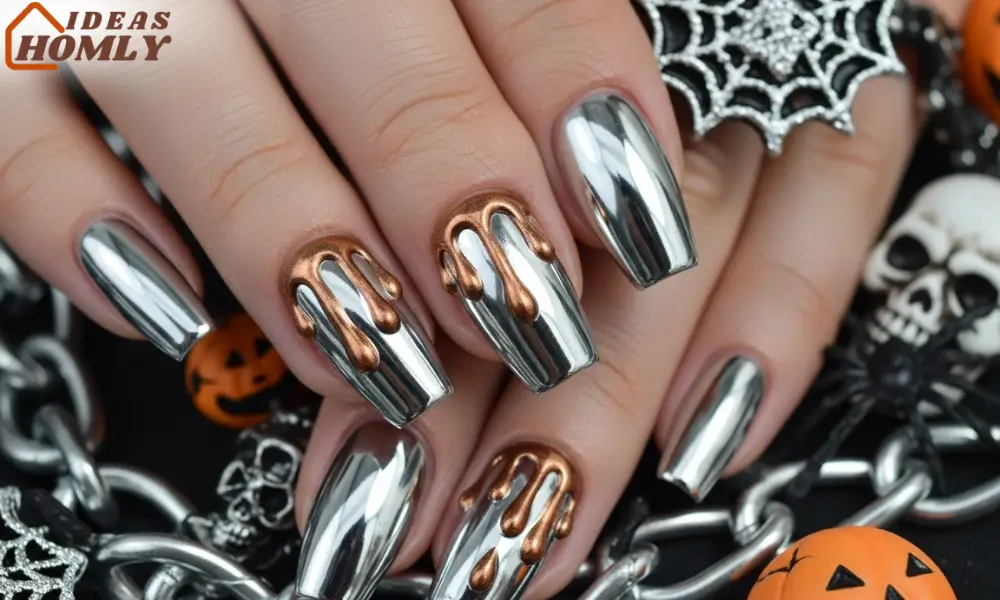
The technique usually starts with a chrome or metallic base coat, followed by raised gel drips near the cuticle or nail tip.
Once cured, those drips catch the light and look almost 3D. Some people mix silver and bronze tones for a “forged in fire” vibe, which looks incredible under warm lighting.
This design gives major “mad scientist meets glam rock” energy. If you want to tone it down, try only accenting one or two nails. It still looks expensive and creative but won’t overwhelm the look.
| Material | Purpose |
|---|---|
| Chrome polish | Reflective base effect |
| Clear builder gel | Creates raised metal drips |
| Metallic dust | Enhances molten shine |
8. Glazed Pumpkin Spice Nails
If pumpkin spice lattes had a nail version, this would be it. The glazed pumpkin spice manicure combines warm autumn tones, caramel, copper, and burnt orange with that glossy glazed-donut shine everyone loves. It’s cozy, flattering, and instantly seasonal.
To get this look, start with a pumpkin-toned polish as the base and layer a pearlescent chrome powder or sheer glaze top coat.
The result looks like fresh-baked pumpkin pie on your fingertips. Some artists add cinnamon-speck glitter or golden flakes for that “spice” touch.
I like this design because it bridges Halloween and fall fashion effortlessly. You can wear it before, during, and even after Halloween without it feeling out of place.
Plus, it pairs perfectly with cream sweaters and brown boots, basically, the ultimate autumn accessory.
Color Inspiration Chart:
| Tone | Description |
|---|---|
| Burnt orange | Classic pumpkin warmth |
| Copper shimmer | Adds metallic glow |
| Gold foil accent | Makes nails festive |
9. Negative-Space Bat Nails
This design is proof that minimalist nail art can still be spooky. Negative-space bat nails use the natural nail tone as part of the design, leaving small bat silhouettes floating against a sheer or nude background. It’s elegant, modern, and a lot easier to maintain than full-coverage designs.
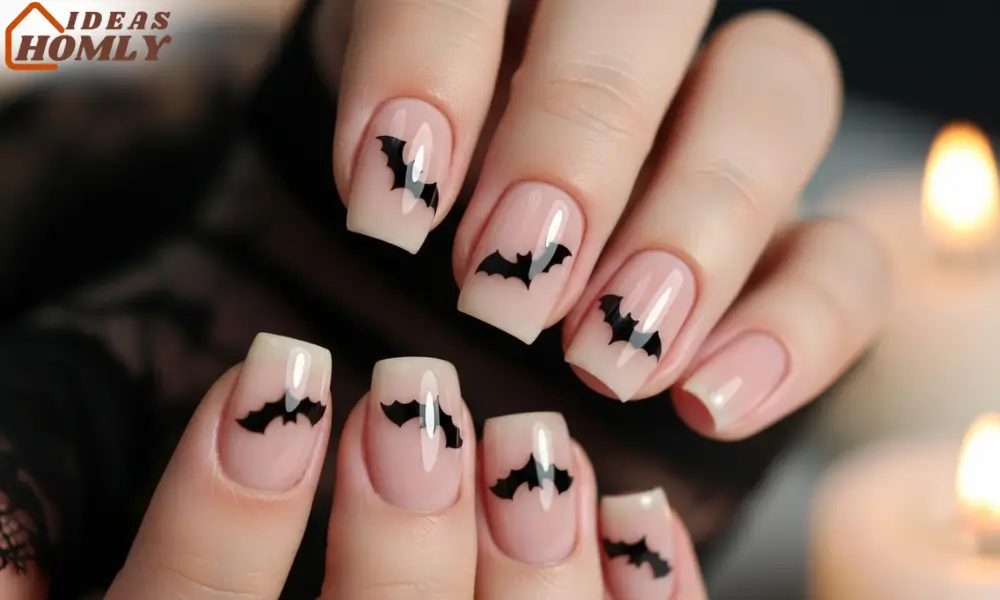
I tried this one with a glossy top coat, and it looked like tiny bats were flying across glass. You can use black polish for the bat outlines or go metallic for a softer contrast. The trick is balance, too many bats can make it messy, so a few perfectly placed ones per hand work best.
This look pairs nicely with any Halloween outfit, especially if you’re not into over-the-top colors. It gives you that subtle spooky edge while keeping things sophisticated.
| Tip for Beginners | Why It Helps |
|---|---|
| Use bat-shaped nail stickers | Makes placement even and clean |
| Apply nude base before drawing | Prevents staining and adds polish longevity |
10. Bubblegum Spooky Nails
Halloween doesn’t always need to be dark and moody; sometimes cute and creepy wins. Bubblegum spooky nails bring together soft pinks, candy purples, and baby blues with playful Halloween details like ghosts, eyeballs, or little cartoon pumpkins.
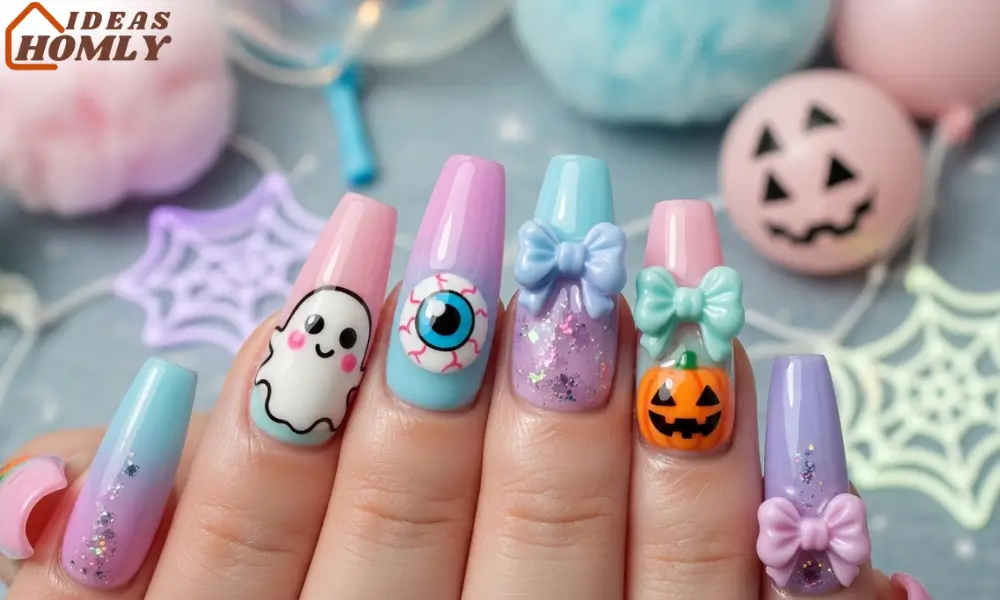
I love how this style looks like something straight out of a 2000s pop album cover but with a Halloween twist. You can add glow-in-the-dark top coats or holographic details to make them pop under party lights.
This manicure is perfect if you’re going for a fun costume like a pastel witch, fairy, or anything Y2K-inspired. It’s a great conversation starter too, I got so many compliments the last time I wore these.
Fun Add-On Ideas:
- Tiny 3D bows or gems for extra cuteness
- Cloudy ombré backgrounds
- Pink spiderweb tips for contrast
11. Plaid Flannel Check Nails
Not every Halloween manicure has to be scary, some can just feel autumn-perfect. Plaid flannel check nails take inspiration from cozy fall shirts. The design usually combines warm tones like red, orange, and tan, layered into checkered patterns.
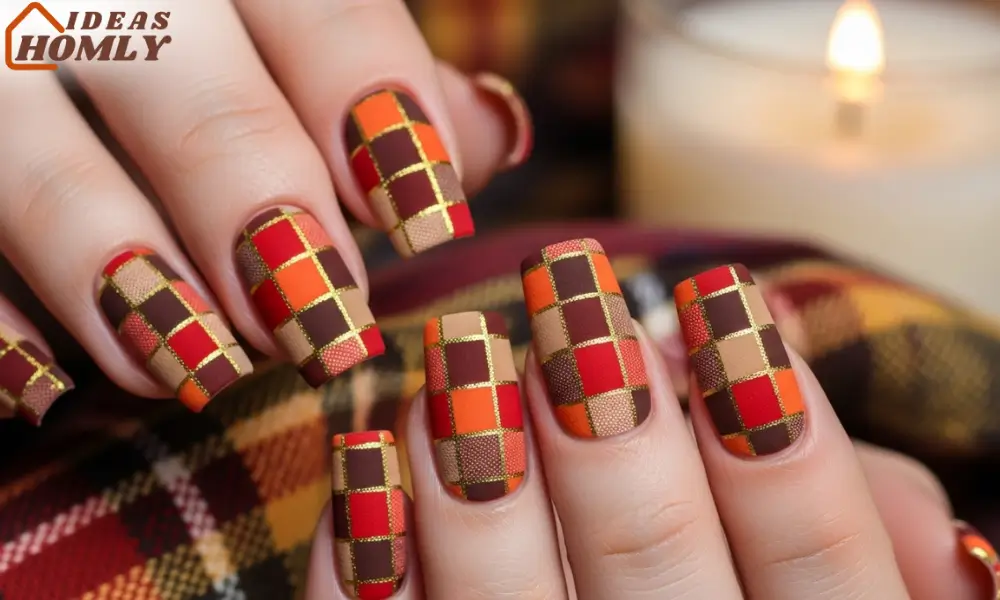
I’ve seen a lot of nail artists mix this with matte finishes, giving it that “fabric texture” illusion. It looks incredible on square or short nails because the pattern fits neatly across the surface. You can even add tiny gold lines to give it a bit of holiday sparkle.
This design works great beyond Halloween. It transitions beautifully into Thanksgiving looks too, which makes it one of the smartest choices for anyone who wants a manicure that lasts the whole season.
| Color Palette Suggestion | Mood It Creates |
|---|---|
| Red, brown, gold | Cozy autumn vibe |
| Orange, black, tan | Seasonal Halloween warmth |
Nail Care Tips for Halloween Looks
After spending time perfecting your Halloween manicure, the last thing you want is chips or dullness before the big night. I’ve learned a few quick tricks that help keep nail art looking fresh for longer.
- Seal with a strong top coat: Reapply every 2-3 days to maintain shine and prevent lifting.
- Use gloves when cleaning or washing dishes: Even mild detergents can fade color or weaken polish.
- Keep cuticles moisturized: Dry cuticles can make nails look older and affect how polish adheres.
- Avoid picking or peeling gel polish: Always soak it off properly to protect your nail surface.
- Store polish away from sunlight: Heat can separate pigments and ruin consistency.
If you plan to wear press-ons or nail extensions, check the adhesive quality and avoid getting them wet for the first few hours. It makes a noticeable difference in how long they stay put.
Conclusion
Halloween nail art in 2025 is all about balance, mixing eerie with elegant, playful with polished. Whether you’re going for ghostly milk-bath designs, molten metal tips, or sweet bubblegum spookiness, each look tells its own story.
What I love about these nail ideas is how customizable they are. You don’t need to follow every trend exactly; you can mix colors, textures, and finishes to suit your own style.
With the right care, these manicures can last well past Halloween, carrying a touch of autumn magic with them.
So if you’ve been waiting for the perfect excuse to experiment, this is it. Grab your favorite polish, a few nail art tools, and bring a little haunted charm to your fingertips.
FAQs
The biggest Halloween nail trends this year include aura glow effects, micro-French slime tips, and cat-eye magnetic finishes. People are also loving chrome cobwebs and cozy plaid designs that feel festive without being too over-the-top.
Yes, absolutely. Many of these designs are beginner-friendly. For example, negative-space bat nails and glazed pumpkin spice looks need minimal tools. A fine brush, a dotting tool, and a steady hand are enough to get started.
With proper care, a gel Halloween manicure can last up to three weeks. Always reapply a clear top coat every few days and avoid harsh chemicals or excessive water exposure to maintain shine and strength.
Classic choices include black, burgundy, burnt orange, and metallic silver. For a fun twist, pastel shades like pink and lilac are trending in 2025 for those who prefer something lighthearted yet festive.
Yes, especially if you’re short on time. Press-ons have come a long way, they’re durable, affordable, and available in trendy Halloween themes. Just make sure to prep your nails properly before applying for better adhesion.