
When it comes to Halloween decorations, small pumpkins are absolute magic. They’re easy to handle, perfect for detailed carving, and look adorable whether you line them on your porch or scatter them across your dining table.
I’ve always felt that small pumpkins bring a cozy charm that large ones sometimes miss; they glow like little lanterns of warmth in the fall air.
Small pumpkin carving isn’t about size; it’s about creativity. You can turn these tiny orange canvases into stunning pieces of art using simple tools, a few creative ideas, and a sprinkle of patience.
In this article, I’m sharing six of my favorite small pumpkin carving ideas that look great indoors or outdoors and can even boost your Halloween photos for Pinterest and Instagram.
Let’s begin with the tools and preparation, the foundation for perfect small pumpkin carvings.
Tools & Preparation
Before you start carving, preparation makes all the difference. Working with small pumpkins means precision matters more than force. Here’s how I usually prepare my mini pumpkins before getting creative.
Best Tools for Small Pumpkin Carving
| Tool | Use | Why I Recommend It |
|---|---|---|
| X-Acto Knife | For detailed designs and outlines | Sharp enough for tiny carvings |
| Clay Loop Tool | For shaving or thinning pumpkin walls | Helps in creating glowing patterns |
| Mini Drill Bits | For making dot designs and small holes | Great for constellation and geometric styles |
| Pumpkin Scooper or Spoon | For cleaning the inside | Makes walls smooth and light shines better |
| Small Marker or Pencil | For sketching outlines | Prevents mistakes during carving |
These tools give you control over delicate work that large carving sets can’t manage. I always keep a soft cloth handy to wipe moisture as I carve; it prevents slipping.
Pumpkin Preparation Tips
- Clean thoroughly. Wash off dirt with mild soap and water, then dry completely.
- Thin the walls. Scoop out the inside until the walls are about one inch thick. It helps the candle or LED light glow evenly.
- Mark the design. Use a pencil to draw your design lightly before cutting. It’s easier to fix mistakes at this stage.
- Work slowly. Small pumpkins require patience; forcing the blade can crack them.
- Use LED lights. They’re safe, bright, and don’t heat up the pumpkin.
Pro Tip: I sometimes chill my pumpkin in the fridge for 10 minutes before carving, it firms up the surface and makes cleaner cuts.
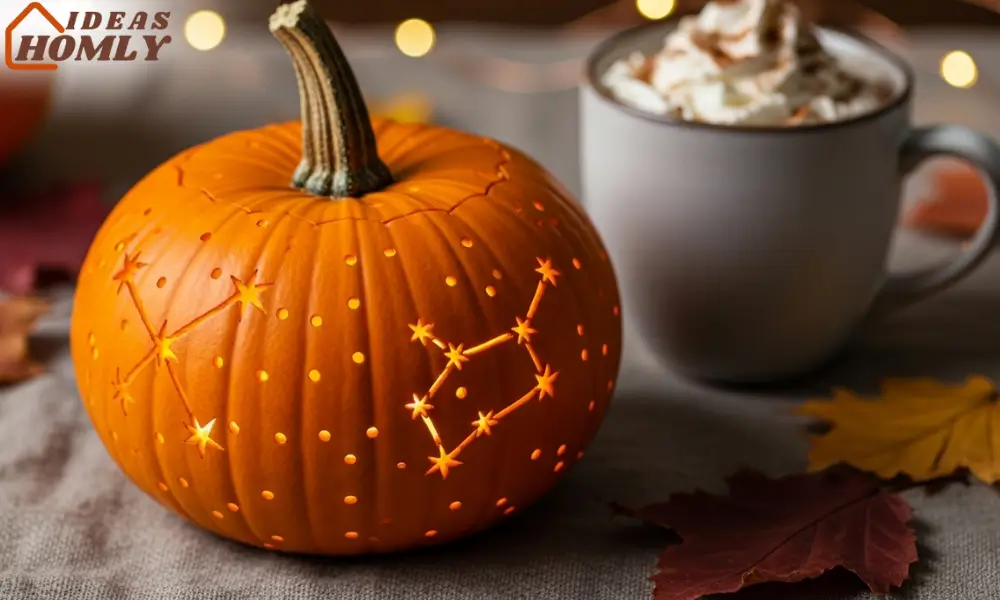
1. Mini Constellation Lanterns
I once tried this on a whim after seeing a starlit pumpkin display at a friend’s house, and it instantly became my favorite. Mini constellation lanterns are both magical and surprisingly simple. You basically turn your pumpkin into a starry night sky.
How to make it:
After cleaning and thinning your pumpkin wall, use a pencil to draw a few small constellations, maybe Orion or the Big Dipper.
Then take a mini drill or a sharp skewer and poke small holes along the pattern. Vary the hole sizes for a twinkling effect.
Once done, pop in a tea light or LED candle and switch off the lights. The result? A glowing pumpkin sprinkled with stars that can light up your room or patio.
These work perfectly in clusters. Line up three or four of them with different patterns and watch how they turn your Halloween night into a celestial experience.
They also photograph beautifully perfect for Pinterest or Instagram if you’re building a Halloween decor board.
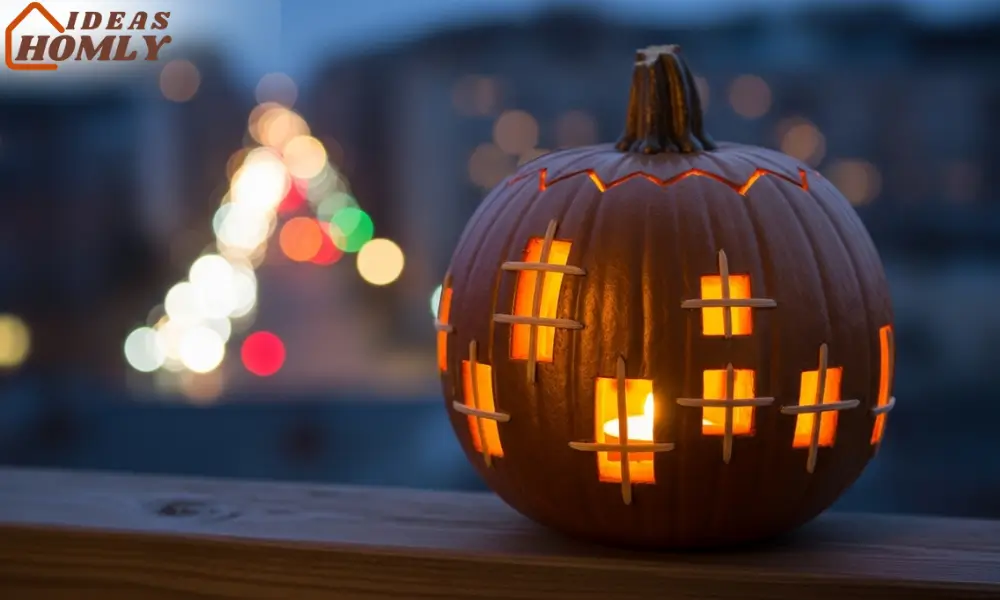
2. Tiny City Windows
If you love cozy urban vibes, this idea is pure gold. Imagine your mini pumpkin as a miniature apartment building glowing from within.
I got inspired by a Halloween market in New York, where artists carved tiny “city windows” on small pumpkins, it looked like a glowing skyline at night.
How to make it:
Use a marker to draw small rectangular “windows” around the pumpkin. Keep them evenly spaced, but vary the shapes for realism.
Then carve them out using an X-Acto knife. If you want, you can use toothpicks to mimic window frames.
For an extra touch, paint the pumpkin in muted gray or bronze tones before carving. Add a small light inside, and you’ll get that charming city glow effect like a Halloween version of a fairy-tale apartment block.
| Display Ideas | Lighting Options |
|---|---|
| Arrange on the outdoor steps | Warm white LED candle |
| Place on window sills | Flickering tealights |
| Arrange on outdoor steps | Solar fairy lights |
This design works best when grouped; it creates the illusion of a little glowing village. Every time I make these, I end up leaving them out even after Halloween.
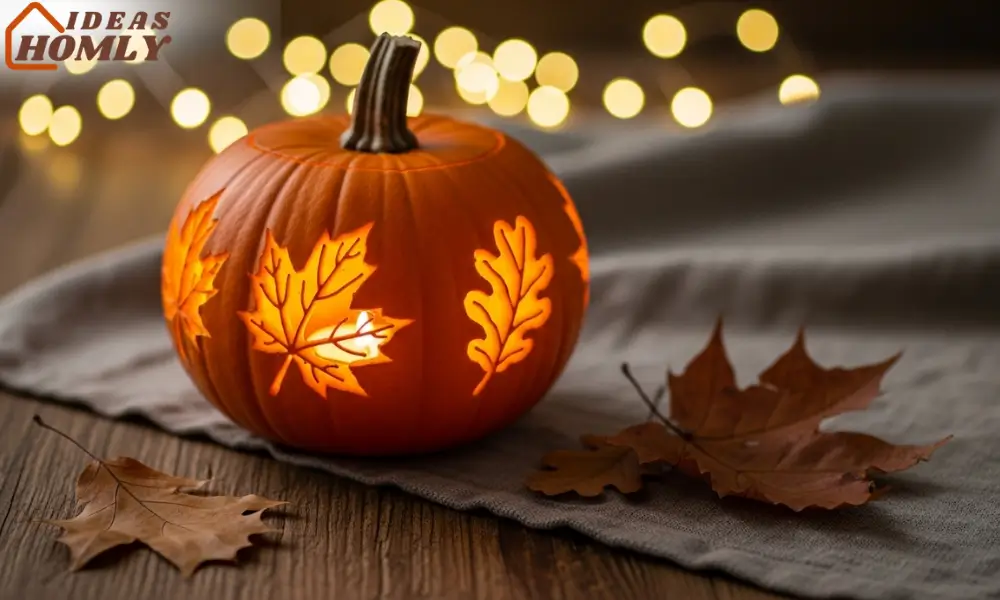
3. Pressed-Leaf Silhouette
This one brings a natural, autumnal touch to Halloween decor. The pressed-leaf silhouette pumpkin combines the warm tones of fall leaves with the glow of candlelight, it’s elegant, simple, and definitely stands out among traditional scary faces.
How to make it:
Start by pressing a few dried fall leaves (maple, oak, or fern work best). Trace the outline of a leaf onto your pumpkin using a pencil. Carve out only the outline not the inside and gently shave the surface just deep enough to let light pass through.
When you light it up, the thinly carved areas glow softly, creating a leaf-like pattern that looks refined and artistic. It’s more “autumn chic” than “haunted house,” making it perfect for indoor decorations or minimalist displays.
You can even use a few mini pumpkins with different leaves and arrange them as a centerpiece. It adds a warm, natural look that fits modern homes and farmhouse-style interiors alike.
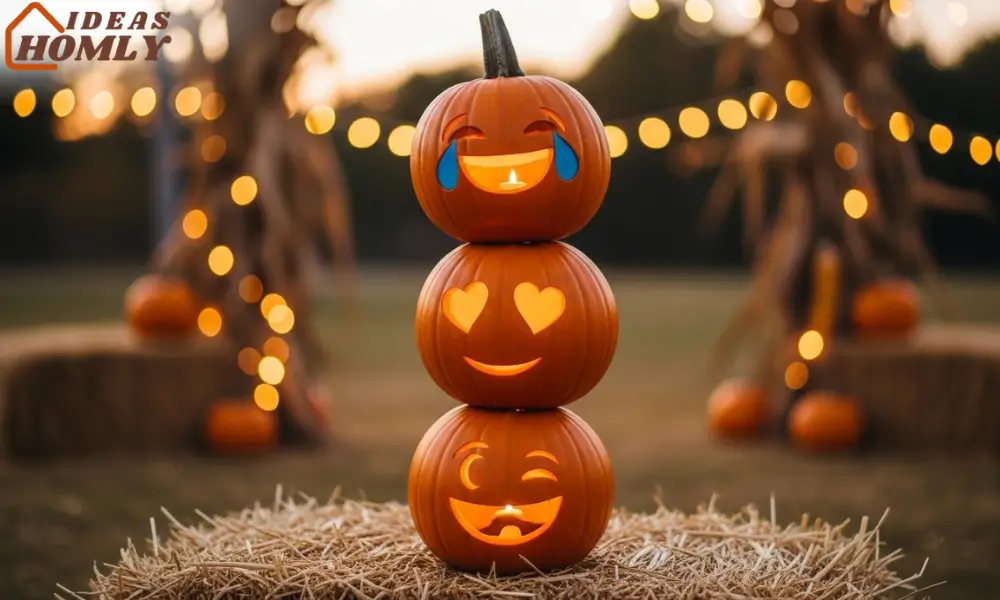
4. Emoji Trio Stack
If you’re like me and can’t resist adding a little humor to your Halloween décor, the emoji trio stack is a winner.
Instead of carving spooky faces, I decided to carve expressions everyone knows, the laughing emoji, the heart eyes, and the classic wink. These instantly grab attention, especially when arranged in a vertical stack.
How to make it:
Choose three mini pumpkins of similar size. Clean and prep them first, then use a pencil to draw simple emoji faces.
I recommend using reference images to keep the expressions accurate. Use an X-Acto knife for delicate lines, especially the eyes and mouth shapes.
Once carved, stack them using wooden skewers for support. Place a small LED candle inside each pumpkin before stacking to create a glowing emoji totem. It’s playful, modern, and perfect for family-friendly Halloween setups.
This idea isn’t just for display, it’s a conversation starter. I’ve had neighbors stop and laugh just looking at it. The warm light shining through those familiar faces creates a friendly, fun vibe instead of something spooky.
| Emoji Pumpkin Tips | Why It Works |
|---|---|
| Use stackable pumpkins | Creates balanced height |
| Choose bright yellow-orange pumpkins | Keeps the emoji look natural |
| Add battery LED candles | Avoids heat and melting |
| Spray light coat of sealant | Keeps them fresh longer |
These pumpkins are perfect for social media posts too. I once posted my emoji stack on Pinterest, and it quickly became one of my most-shared Halloween pins. It’s simple yet super photogenic.
5. Micro Bat Swarm
Now, this one brings a little gothic edge without getting messy. The micro bat swarm design turns a small pumpkin into a fluttering night scene. I came up with this idea after watching a few bats circle my porch light one October evening.
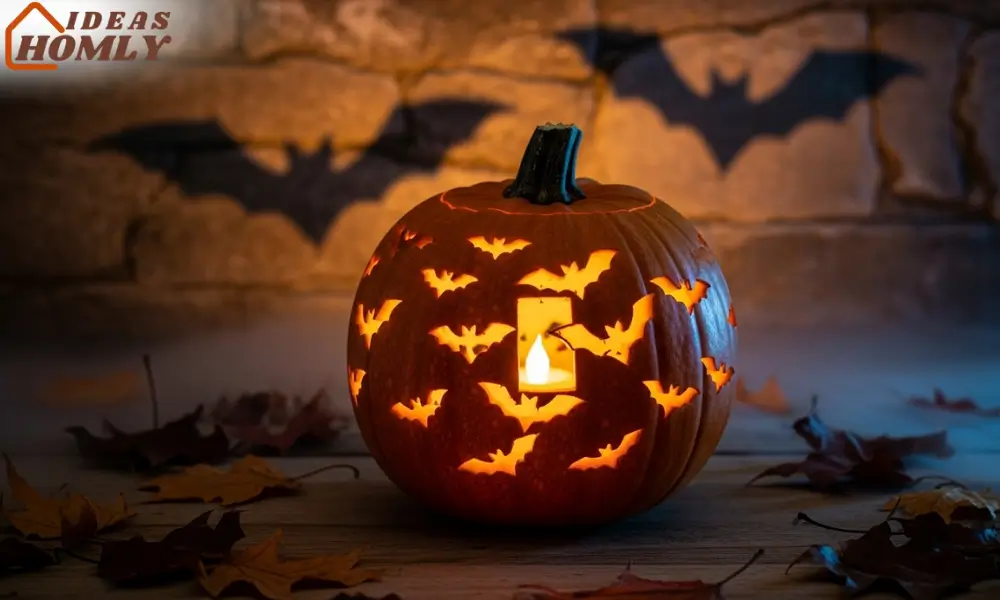
How to make it:
Draw several small bats in different flight poses across the pumpkin’s surface. You can print a stencil or trace tiny bat shapes using a paper cutout. Carefully carve the bats, keeping the wings connected to the pumpkin’s body so they don’t break.
For more texture, carve only the outlines of some bats and fully cut out others. When you add a candle inside, you’ll see glowing and shadowed bats, creating a layered visual effect.
Place these pumpkins on darker surfaces or near your front door lights, the glow combined with shadows gives a dramatic illusion, almost as if the bats are really flying.
I also love placing one of these near a bowl of candy. It sets a perfect Halloween tone: a little spooky, a little artistic, and definitely attention-grabbing.
Variation Idea: Paint the pumpkin matte black before carving and use a bright white or red LED light inside for a glowing contrast. It looks incredible in nighttime photos.
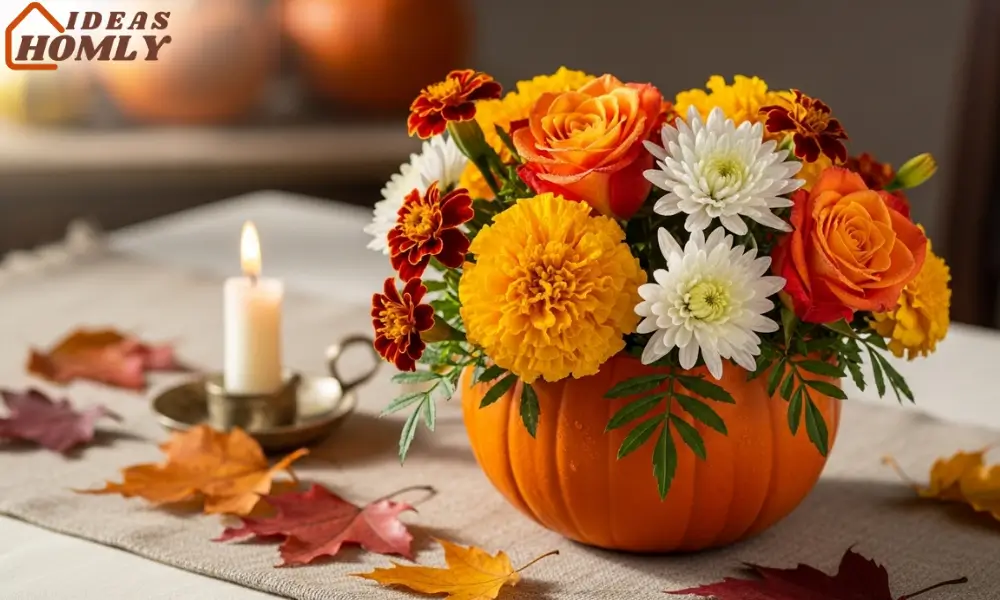
6. Mini Flower-Vase Pumpkin
After all the glowing faces and spooky motifs, I like ending with something fresh and calming, the mini flower-vase pumpkin. It’s not just cute; it brings elegance to Halloween displays, especially when you mix carved pumpkins with fall florals.
How to make it:
Cut off the top of a small pumpkin and scoop out the insides. You don’t even have to carve designs; just make sure the inner wall is smooth.
Fill the cavity with floral foam or a small cup of water, and arrange flowers like marigolds, chrysanthemums, or orange roses.
If you still want the carved look, you can shave delicate leaf or swirl patterns around the edges for a touch of texture. The candlelight from nearby pumpkins reflects off the vase, giving a soft, cozy glow.
I’ve used this design as a table centerpiece, mixing two floral pumpkins with smaller carved ones. Guests always compliment how it blends spooky and elegant in the same display.
| Flower Choices | Color Theme | Ideal Use |
|---|---|---|
| Marigolds, orange roses | Warm fall tones | Indoor centerpieces |
| White chrysanthemums | Contrast with orange | Minimalist setups |
| Dried lavender or wheat | Rustic touch | Outdoor porches |
This idea also doubles as a thoughtful handmade gift. A mini pumpkin vase looks charming when paired with a small note card; perfect for teachers, neighbors, or party hosts.
Lighting & Display Tips
Once all your pumpkins are ready, it’s time to make them shine, literally. Proper lighting transforms a good carving into a stunning decoration. I’ve tried different setups over the years, and these are the tricks that always work for me.
- Use LED tea lights. They’re bright, safe, and reusable. No heat means no pumpkin shrinkage.
- Group your pumpkins by theme. Combine constellations with city windows or emojis with bats to create a visual story.
- Play with height. Stack pumpkins on books, crates, or inverted bowls to add layers to your display.
- Add reflective surfaces. Mirrors or silver trays underneath can enhance the glow and make the light spread wider.
- For outdoors, use weighted bases or garden spikes to prevent pumpkins from rolling or blowing over in the wind.
Pro Tip: If you want that moody Halloween glow, switch off other lights and place a single orange bulb nearby. It enhances the carvings’ shadows and looks fantastic in photos.
Photo & Social Media Tips
I love sharing my Halloween decor online, especially on Pinterest and Instagram, and over time, I’ve learned a few tricks to make pumpkin photos pop.
- Use natural light. Early evening or golden hour gives pumpkins a warm, flattering glow.
- Keep backgrounds simple. Neutral or dark backdrops help the carved details stand out.
- Shoot from low angles. This makes small pumpkins look larger and more dramatic.
- Add props. Mini brooms, small lanterns, or artificial cobwebs can give context without stealing attention.
- Edit lightly. Boost brightness and contrast slightly, but avoid over-saturation. The goal is to keep it natural.
If you’re trying to grow a Pinterest board or bring traffic to your blog, post multiple angles of each pumpkin idea. I often create short “how-to” pins showing the carving process step by step, they get a lot more engagement than just finished pictures.
Common Mistakes & How to Avoid Them
I’ve had my fair share of pumpkin disasters, from cracked shells to collapsed carvings. Learning from them helped me improve a lot.
Here are a few common mistakes I’ve noticed people make when carving small pumpkins, along with easy fixes.
1. Skipping the cleaning step
Many people rush straight into carving without properly cleaning or drying their pumpkin. Moisture makes the surface slippery and causes early decay. Always wash, dry, and let it sit for a few minutes before starting.
2. Carving too deeply
Small pumpkins don’t have thick walls. When you cut too deep, they lose structure. Stick to shallow cuts — especially if you’re making patterns like constellations or bats. Shaving instead of cutting through can give you a soft glow and a longer-lasting design.
3. Ignoring wall thickness
Uneven walls create dim spots where light can’t pass evenly. Use a spoon or clay loop tool to make the walls uniform. It takes a little time but improves the final effect.
4. Using real candles
Real candles might look nostalgic, but they can heat up the pumpkin and cause melting or charring. I always stick with LED lights — they’re safe, reusable, and don’t dry out the design.
5. Storing pumpkins wrong
Leaving your pumpkins under direct sunlight or in damp conditions can ruin them quickly. Keep them in a cool, dry place and spray them with a light coat of clear sealant if you plan to display them longer than a few days.
A small table always helps to keep track of your pumpkin’s freshness:
| Condition | What It Means | Fix |
|---|---|---|
| Soft spots forming | Beginning of decay | Apply petroleum jelly on carved edges |
| White mold spots | Too much moisture | Wipe with diluted vinegar |
| Pumpkin losing shape | Overheating | Move to cooler area, use LED only |
These small tweaks can help your pumpkins stay fresh and photo-ready through Halloween week.
Conclusion
Small pumpkins might look humble, but when carved with creativity, they become the stars of Halloween decor. Each idea from the starlit constellations to the elegant flower vase adds its own personality to your space.
I’ve learned that small pumpkins invite more imagination because you focus on detail, not just size.
Whether you want something cute like the emoji stack or slightly eerie like the bat swarm, there’s no wrong choice here. Try mixing styles to make your own Halloween corner feel unique.
Carving these pumpkins feels more relaxing than working on a huge one. You can finish them in one sitting, experiment with designs, and even let kids join in safely.
Every year, I try at least one new idea, and honestly, these tiny glowing creations always steal the spotlight.
So this Halloween, skip the oversized pumpkins and go small. Sometimes, little things truly make the biggest impact.
FAQs
Small carved pumpkins usually last 3-7 days, depending on temperature and humidity. To extend their life, keep them refrigerated overnight or in a cool, dry spot during the day. I also spray mine with a light vinegar-water mix to slow down mold growth.
LED tea lights or battery candles work best. They’re flameless, reusable, and bright enough to show details without heating the pumpkin. I’ve found that warm white lights look the most natural for Halloween displays.
Absolutely! Painting is a great alternative, especially for kids or quick decor. Acrylic paint or chalk paint sticks well. You can even combine carving and painting, like carving eyes and painting extra details for expression.
After carving, lightly coat the edges with petroleum jelly or cooking oil. This locks in moisture and keeps the design crisp longer. I also avoid leaving mine under direct sunlight, it dries them fast.
Baby Boo, Jack Be Little, and Munchkin pumpkins are ideal. They have smooth skin, firm flesh, and bright color. I always choose ones that feel heavy for their size, that’s a sign they’re fresh and easy to carve cleanly.