If you’re a Peanuts fan like me, you probably agree that no Halloween is complete without Snoopy somewhere in the décor.
And what better way to bring this comic icon to life than with a Snoopy pumpkin carving? These designs blend nostalgia, humor, and that cozy fall feeling we all crave in October.
Carving Snoopy on a pumpkin isn’t just about showing off your fandom; it’s also surprisingly relaxing. You get to recreate the playful spirit of the comic strip while lighting up your porch with something unique and cheerful.
Whether you’re new to carving or already a pro with a pumpkin saw, I’ve got a few charming designs that can make your jack-o’-lanterns the highlight of the block.
Before we get to the five Snoopy carving ideas, let’s talk about choosing the best pumpkins and prep methods for those crisp cartoon outlines.
Best Pumpkin Shapes & Prep for Cartoon Silhouettes
Whenever I work on a detailed cartoon design, I focus on pumpkin shape and surface first.
Smooth, round, and evenly colored pumpkins make it easier to transfer those classic Peanuts outlines. A slightly oval shape works best for Snoopy’s long body or the famous doghouse.
Here’s a quick reference table I always keep in mind before starting:
| Pumpkin Type | Ideal For | Key Features | Carving Difficulty |
|---|---|---|---|
| Tall Oval Pumpkin | Doghouse or Profile scenes | Wide surface for detailed art | Medium |
| Round Medium Pumpkin | Snoopy & Woodstock | Smooth finish for silhouettes | Easy |
| Flat-Front Pumpkin | Comic strip frame designs | Naturally displays flat carvings | Easy |
Prep Tip 1: Always clean the pumpkin’s inside thoroughly. Any leftover stringy bits can block light and ruin the final glow.
Prep Tip 2: If you plan to light from the bottom, trim a small flat base. It keeps the pumpkin steady and avoids shadow flicker in the design.
Prep Tip 3: Tape your stencil firmly before tracing. I use a poking tool to outline the design first, then carve gently with a fine saw.
Once your pumpkin is ready, it’s time to bring Snoopy and friends to life.
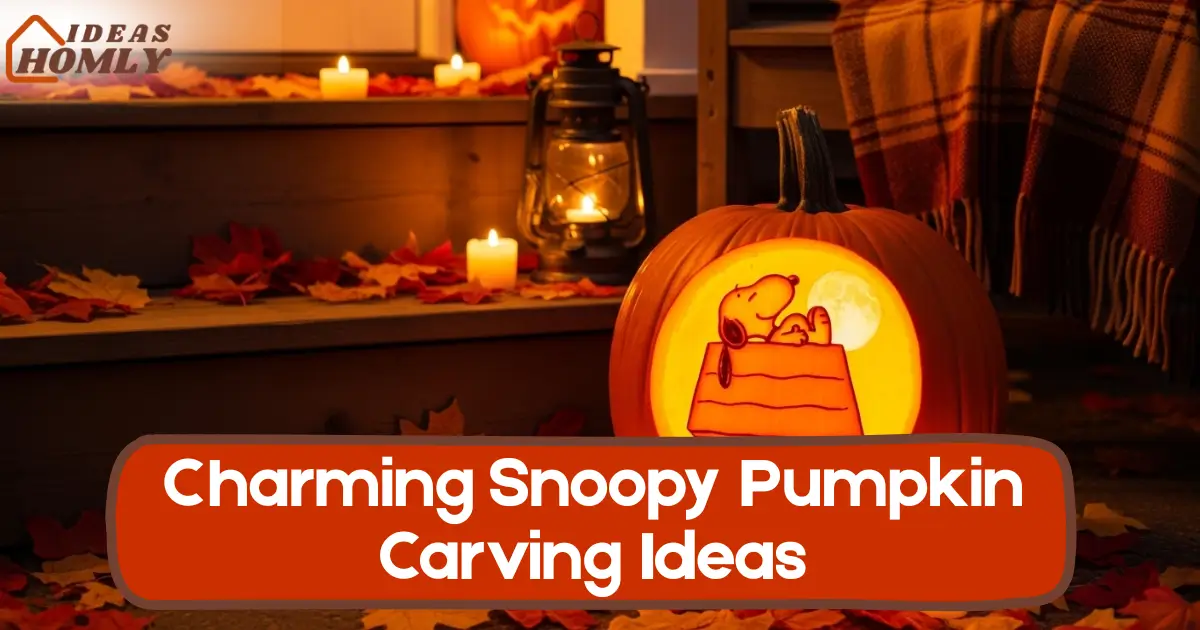
1. Snoopy on Doghouse Under Moon
This one’s a classic, and I’ll be honest that it never gets old. It captures that serene Peanuts moment: Snoopy relaxing on top of his doghouse, with the moon shining behind him.
When carving this, I usually start with a medium or tall pumpkin so there’s enough space for the moon’s curve. I trace the doghouse base first, then add Snoopy’s outline on top, keeping his nose slightly tilted up.
The trick is to carve the moon as a shallow cut rather than a full-through hole. That subtle glow adds depth and makes Snoopy’s silhouette pop beautifully.
You can even use a mini LED tea light and place it slightly behind the moon section for that warm nighttime effect. I once tried it with a yellow-tinted bulb, it gave off the perfect cartoon glow!
Pro Tip: If you have extra time, carve small stars around the moon using a mini drill bit. It adds that dreamy night-sky touch without much effort.
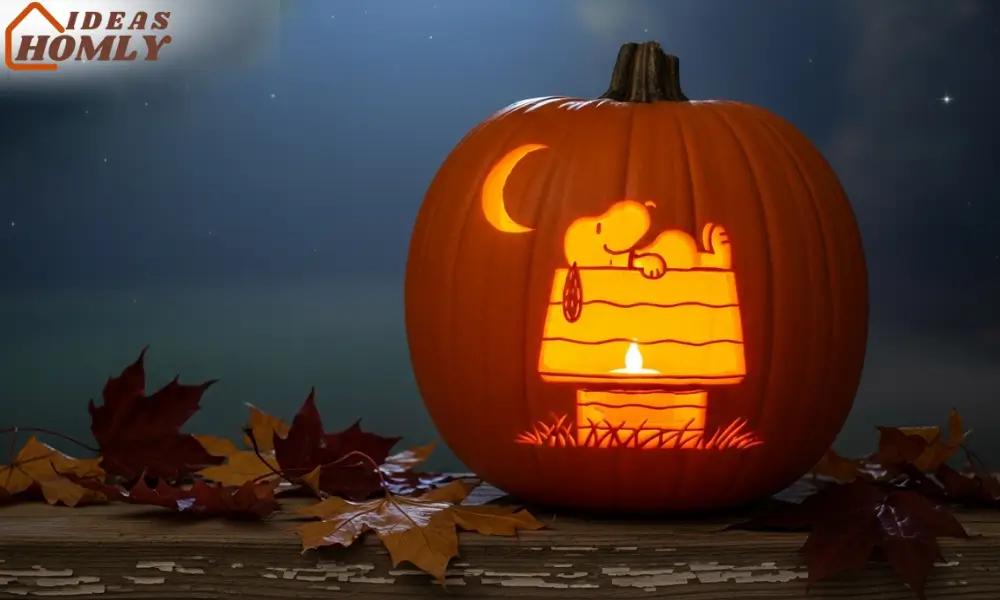
2. Flying Ace Profile
Now, this one is for the true comic lovers. Snoopy as the Flying Ace is easily one of the most recognizable Peanuts scenes, and it translates perfectly to pumpkin art.
I prefer a slightly taller pumpkin for this because you’ll want to capture the detail of Snoopy’s flying cap, goggles, and scarf. To make the carving easier, simplify the scarf flow into a few curved lines rather than the full fluttering motion.
Start by sketching his side profile, head slightly tilted forward, goggles visible. Then carve in layers:
- First layer: Outline only (don’t cut through).
- Second layer: Remove thinner areas like the scarf’s edges for shading.
- Third layer: Cut through the eye and nose areas for contrast.
Once it’s lit, the shading will make Snoopy look mid-flight. I’ve also seen people add a mini propeller below using a separate pumpkin slice—it’s optional but fun if you want a creative touch.
Lighting tip: Position a warm LED from below to highlight the face area. It gives that heroic glow that fits the Flying Ace perfectly.
3. Woodstock Trio on Vine
If Snoopy is the star, Woodstock is the loyal sidekick we all adore. I once carved this scene on a smaller pumpkin and used three little Woodstocks sitting on a vine—it turned out surprisingly charming.
You’ll need a round medium pumpkin with a smooth finish for this one. Start by sketching a simple vine curving across the middle, then space out three small Woodstocks sitting along it.
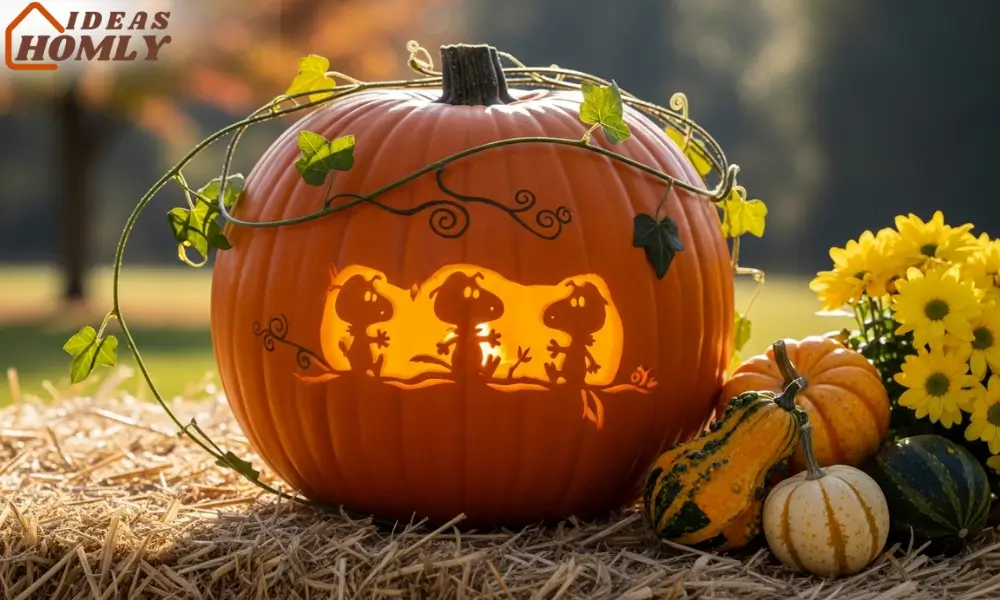
Each bird can have a slightly different pose: one looking up, one sideways, and one nodding down.
Keep the lines clean and thin; Woodstocks look best when carved as silhouettes rather than detailed faces. If you have patience, drill a few small leaf shapes around the vine to balance the design.
What I like about this pattern is how easy it is to combine with other Snoopy carvings. I once placed it beside the doghouse pumpkin, and the pairing looked like a complete Peanuts garden scene.
4. Pumpkin Nap (Snoopy Lying)
There’s something about Snoopy taking a nap that always makes me smile. It’s simple, wholesome, and feels perfectly cozy for Halloween nights. If you want a cute and beginner-friendly Snoopy pumpkin carving idea, this is the one.
I go for a medium-wide pumpkin because it gives enough room for Snoopy’s stretched-out body.
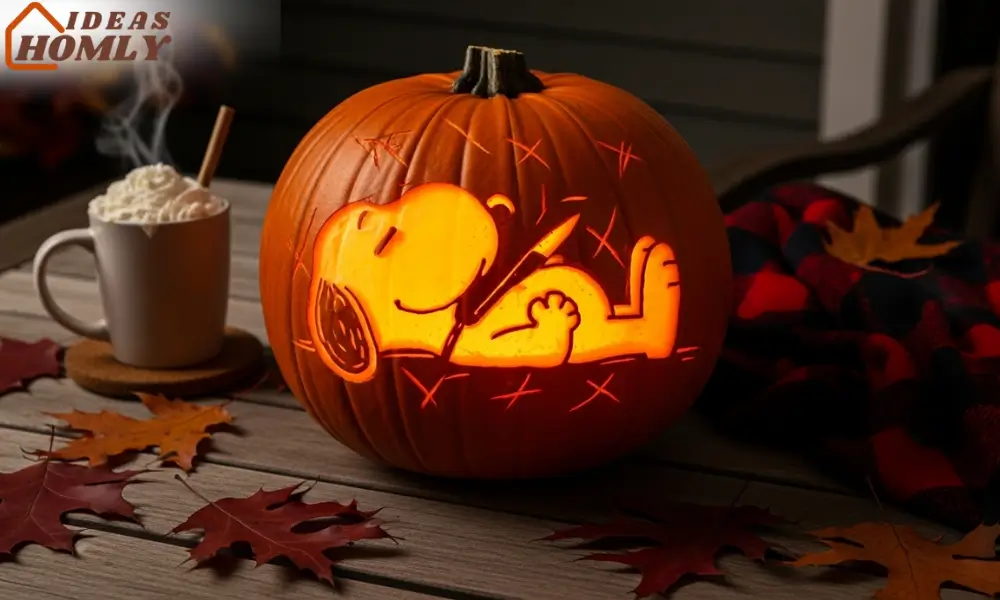
First, draw a gentle curve for the ground line near the bottom, then sketch Snoopy lying on his back with his legs slightly bent. The goal isn’t perfection, it’s about getting that relaxed, comic-like shape.
When carving, I only cut out the outline of his body and keep the inner parts shallow. This way, the light glows softly through Snoopy’s face and belly, while the ears and arms stay darker. The result? A cozy snoozing dog with perfect shadow contrast.
For extra charm, I sometimes carve a tiny Woodstock sitting on his belly, which makes the design feel like it came straight from the comic strip. Add a small LED candle with a yellow tint, and the glow instantly turns the pumpkin into a warm, sleepy scene.
Pro Tip: Smoothly thin the pumpkin wall behind Snoopy’s head to get softer light transitions; it gives that dreamy nap effect without harsh lines.
5. Comic Strip Frame
If you’re a die-hard Peanuts reader, this one’s a must-try. The Comic Strip Frame design transforms your pumpkin into a mini Peanuts scene that looks like a single panel from the newspaper. It’s one of my favorite projects because it combines creativity and nostalgia perfectly.
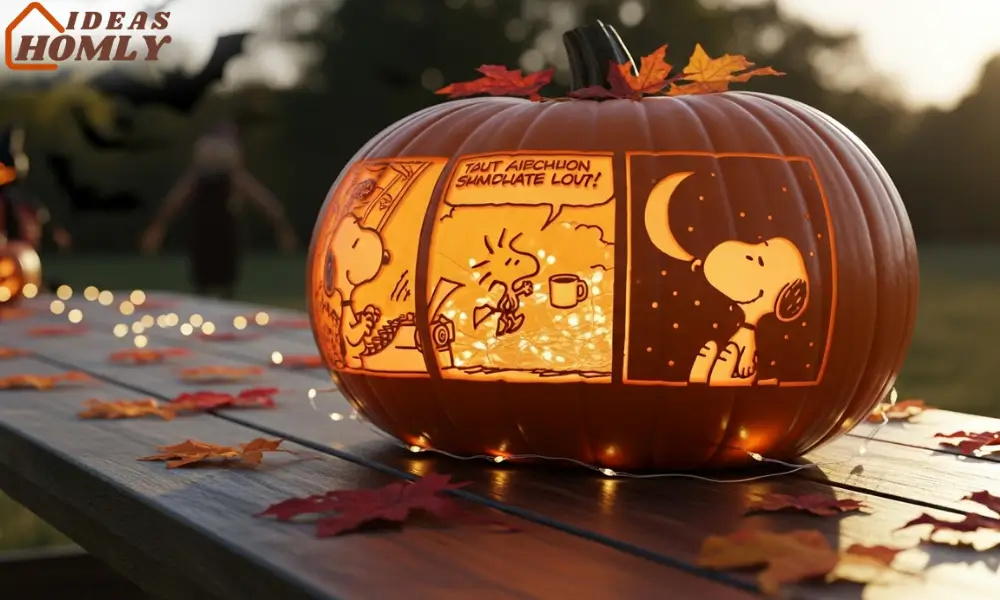
Choose a flat-front pumpkin for this; those slightly squashed ones work best. First, divide the surface into two or three rectangular panels using a tracing tool.
Inside each panel, you can add simple outlines of Snoopy, Woodstock, or even Charlie Brown. Keep the details minimal, focusing on expressions and shapes.
Here’s how I usually design mine:
| Panel | Scene Idea | Difficulty | Lighting Suggestion |
|---|---|---|---|
| 1 | Snoopy typing on a typewriter | Medium | Warm light for focus |
| 2 | Woodstock bringing coffee | Easy | Dim amber tone |
| 3 | Snoopy sighing at the moon | Medium | Soft white glow |
If you’re using multiple pumpkins, carve one scene on each and arrange them in a row. Together, they’ll look like a glowing comic strip that stretches across your porch.
Lighting tip: Place small fairy lights behind the panels instead of one central candle. It gives a more even light spread and makes every panel visible.
Combining Snoopy Designs
Now, here’s where it gets fun. You don’t need to limit yourself to just one Snoopy design. Combining a few can create a Peanuts-themed pumpkin display that steals all the attention on Halloween night.
For example, pair Snoopy on the Doghouse with the Woodstock Trio nearby, it creates a full garden scene.
You can even line up Comic Strip Frame pumpkins next to them for a story-like setup. The key is to use different pumpkin sizes to create dimension.
Here are a few pairing ideas I’ve tried before:
- Medium + Small Pumpkins: Snoopy and Woodstock combo.
- Tall + Flat Pumpkins: Doghouse and Comic Frame sequence.
- Three Small Pumpkins: Woodstock Trio plus Snoopy Nap for a cozy corner display.
If you’re hosting a Halloween party, arrange them on a long table with artificial leaves and LED candles. The glowing pumpkins instantly become conversation starters, especially among Peanuts fans.
Pro Tip: If you want your display to last longer, brush a thin layer of petroleum jelly on the carved edges. It slows down drying and helps the pumpkins stay fresh for days.
Photo & Display Tips
No matter how detailed your carving is, good lighting and smart photography can make all the difference. If you’re planning to share your Snoopy pumpkin carving ideas on social media or Pinterest, a few simple tricks can make your photos pop.
- Choose a dark background. I usually photograph mine against black fabric or a wooden porch wall to make the glow stand out.
- Use warm lighting. Avoid harsh white LEDs. Go for yellow or orange-toned bulbs to match the Halloween vibe.
- Take photos at dusk. That soft evening light adds depth to the pumpkin’s glow and avoids overexposure.
- Highlight the details. Capture side angles to show carving depth or layering—especially if you used shading.
- Add small props. A tiny Peanuts figurine or fall leaf can complete the photo and give it that warm autumn touch.
I once posted a group of Snoopy pumpkins under string lights, and it easily became one of my most pinned Halloween posts. Sometimes, it’s the small staging details that make your carving look professional.
Extra Tip: If you’re showcasing multiple pumpkins, group them by height and size. It draws the eye naturally from one design to the next.
Conclusion
There’s something special about combining nostalgia and creativity in one simple pumpkin.
Each of these Snoopy pumpkin carving ideas brings a different side of the Peanuts universe to life, whether it’s the cozy calm of Snoopy’s nap, the humor of the Flying Ace, or the charm of Woodstock perched on a vine.
If you ask me, what makes these designs stand out is how easily they connect with people. Even someone who hasn’t read the comics in years will recognize that familiar outline of Snoopy lounging under the moon. And for us fans, it’s like adding a glowing tribute to the world Charles Schulz created.
I always say that pumpkin carving doesn’t need to be complicated to look amazing. With a bit of planning, steady hands, and the right lighting, anyone can make their Snoopy jack-o’-lanterns look straight out of a comic strip.
Plus, when you display a few of these together, it feels like your porch is part of the Peanuts story itself; warm, playful, and a little nostalgic.
So grab a carving kit, print out your favorite stencil, and get started. Whether it’s Snoopy napping, flying, or typing away, you’ll end up with a Halloween display that feels truly personal and delightfully timeless.
FAQs
If you’re new to carving, start with Snoopy lying down or the Woodstock Trio. These designs have simpler shapes and fewer small details. The nap scene, especially, relies on curved outlines rather than sharp angles, making it beginner-friendly while still looking adorable once lit up.
I recommend a pumpkin carving kit that includes mini saws and detail knives. You can also use a small drill bit for Snoopy’s nose or eye areas. For finer details, a clay loop tool helps clean edges and add texture. Avoid heavy kitchen knives; they’re unsafe and less precise.
To get that soft, even glow, thin the pumpkin walls behind larger shapes like the moon or Snoopy’s body. Then, place two LED candles inside, one centered and one slightly toward the back. Avoid open flames, as they can cause uneven lighting and dry out the pumpkin faster.
Carved pumpkins typically last 4–6 days if kept cool. To extend their life, store them in a shaded area and brush the carved edges with petroleum jelly. You can also lightly mist them with a bleach-water mix (1 tablespoon bleach per quart of water) to prevent mold growth.
Absolutely! Painting works great if you prefer clean outlines or want your pumpkin to last longer. I sometimes paint Snoopy’s scarf or Woodstock’s feathers to add color accents. Just make sure to use acrylic paints and let them dry completely before lighting the pumpkin from inside.