A full and professional Christmas tree starts with the right ribbon idea, and I learned this after years of adjusting saggy bows and uneven loops. Every time I used good ribbon techniques, the tree instantly looked fuller and more styled.
I realized most people struggle with the same issue because ribbon placement feels confusing at first. With a few simple ideas, you can shape your tree like a stylist without spending a fortune.
I use these ribbon methods because they add structure, color, and shape, and they help the tree look fuller even when the branches are not.
These ideas work for small and tall trees, and they easily blend with farmhouse, glam, traditional, or natural Christmas themes. I like keeping things simple because the season already brings enough chaos on its own.
Why These Ribbon Ideas Are Trending This Season
These ribbon ideas trend this year because people prefer trees that look styled without looking stiff. I noticed many home decorators using flexible ribbon flows instead of tight, perfectly looped patterns.
The focus is on natural movement that still feels complete. This style also makes the tree look fuller instantly, which is helpful when branches look thin.
Another reason these ideas trend is that people want budget friendly ways to improve their tree designs. Ribbon adds volume without needing hundreds of ornaments.
I also see many choosing textured or wired ribbons because they stay in shape and hold their curves. This gives the tree a lifted look and makes it appear professionally arranged.
I also noticed that people like ribbon ideas that match multiple decor themes. Whether someone decorates a modern room or a cozy farmhouse space, the ribbon works as a unifying detail. That is why these Christmas ribbon styles appear everywhere from social media trends to real home setups.
1. Vertical Ribbon Cascade
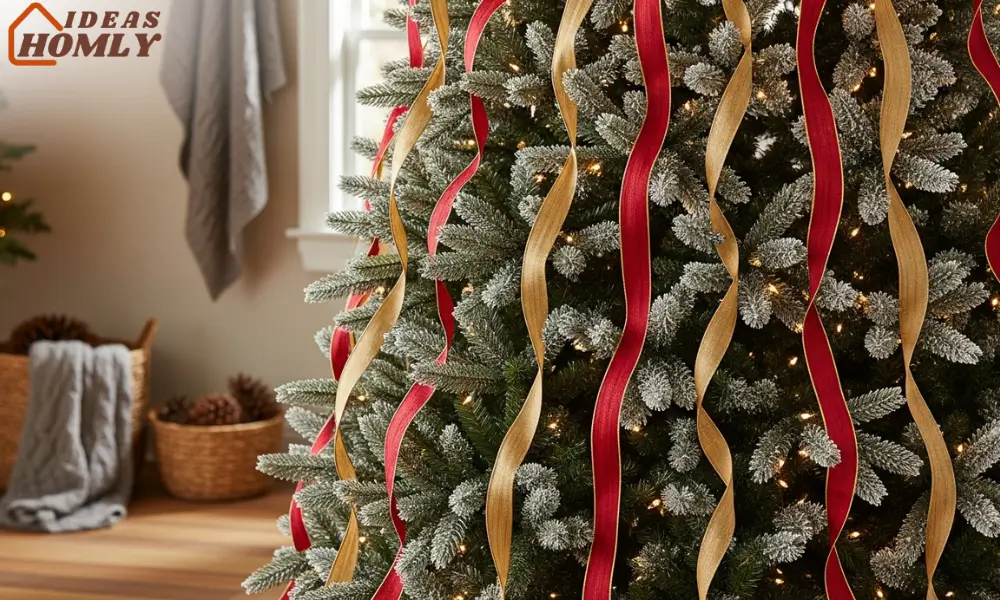
How The Vertical Cascade Creates A Full Look
The vertical cascade always adds height to my tree and gives it a clean, symmetrical shape. I like using this method when I want the tree to look taller and more polished.
The ribbon drops from the top to the bottom, and the gentle waves help fill open gaps. This method also works for both wide and narrow trees, which makes it practical.
When I use this idea, I start at the top and tuck the ribbon into the branches every few inches. This creates soft curves instead of stiff straight lines. The ribbon naturally gives the tree a fuller look because it fills the inner sections that usually stay empty. I like mixing two widths of ribbon for more depth.
Tips For A Smooth Cascade
I prefer wired ribbon because it stays in place and holds every wave. If you want a softer look, satin ribbon also works, but wired ribbon gives more control. I avoid pulling the ribbon too tight because it loses its curve. Light pressure helps it fall smoothly.
I also learned that using long ribbon pieces instead of one giant strip keeps the flow from looking forced. Shorter strands give more natural movement.
2. Diagonal Ribbon Wrap

Why I Like The Diagonal Wrap For A Balanced Tree
The diagonal wrap always gives my tree a classic designer look. This idea circles the tree in a spiral, which creates balance from top to bottom.
I use it whenever I want the tree to look neat and evenly spaced. It spreads color across the entire tree, and it helps tie together ornaments placed in different sections.
The best part is that the diagonal wrap works with any ribbon pattern. I use plaid for a cozy theme or metallic ribbon for a glam Christmas style. The small angle of the wrap keeps the ribbon from covering too much space, so the ornaments still shine. I use this idea on trees that look too tall or thin because the wrap gives them shape.
How I Apply The Wrap Without Gaps
I start near the top and move downward in a slow spiral. I tuck the ribbon in every few inches to keep it secure. The trick that helped me most is adjusting the angle as I move down. A wider angle gives a softer spiral, while a tighter angle looks more structured.
I also use medium-length ribbon strips instead of wrapping one piece around the entire tree. This keeps the ribbon from sagging over time.
3. Bow-Topped Ribbon Tree

Why The Bow Topping Method Always Looks Professional
The bow-topping idea creates an instant focal point. I use it whenever I want the tree to look styled from the top down. The bow acts like the anchor and the ribbon strands fall from it.
This gives the tree a flowing design that spreads evenly. It also helps the top look complete without adding a heavy tree topper.
I like using layered bows because they add volume without effort. When the ribbon falls straight from the bow, it creates natural movement that feels soft. I match the bow color with the rest of the ribbon so the tree looks cohesive. This method looks professional because everything flows from one central point.
How I Build A Strong Tree Bow
I use wired ribbon so the loops stay open. I start with large loops at the base and add smaller loops on top. This keeps the bow from flattening. I secure the bow with floral wire and then attach it to a strong upper branch.
When I add the cascading ribbon strands, I spread them evenly across the tree so it never looks one-sided.
4. Layered Ribbons in Mixed Textures
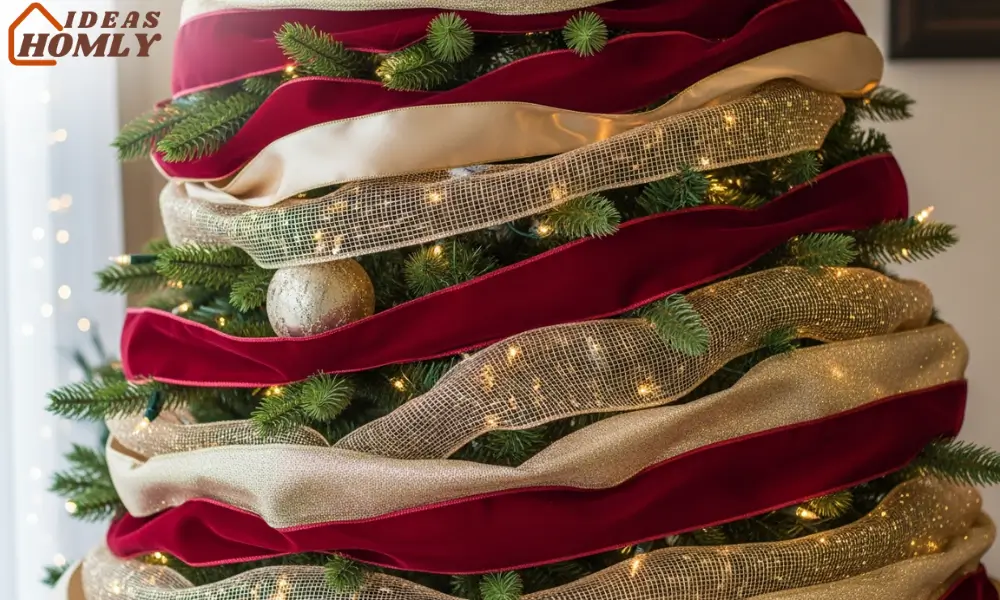
Why Mixed Textures Make The Tree Look Fuller
Mixed ribbon textures always give my tree the layered, high end look that decorators use in showrooms. I use this method when I want the tree to look richer without adding too many ornaments.
The textures naturally add depth and shadow, which makes the tree look full from every angle. It also works well for both modern and traditional themes because textures introduce dimension without feeling heavy.
When I mix textures, I usually pair a wide wired ribbon with a thinner accent ribbon. The contrast helps the wider ribbon set the base while the thinner one adds detail. I also like using soft fabrics like velvet with structured materials like mesh. The difference creates a balanced look that feels deliberate.
How I Layer Ribbons Without Making The Tree Look Busy
I start by placing the main ribbon deeper into the branches. This gives the tree a strong base layer. Then I add the secondary ribbon slightly closer to the surface. This layering prevents the two ribbons from blending into one flat design.
I avoid using too many textures at once because it can overwhelm the tree. Two or three textures usually give the perfect amount of detail.
5. Ribbon And Ornament Clusters
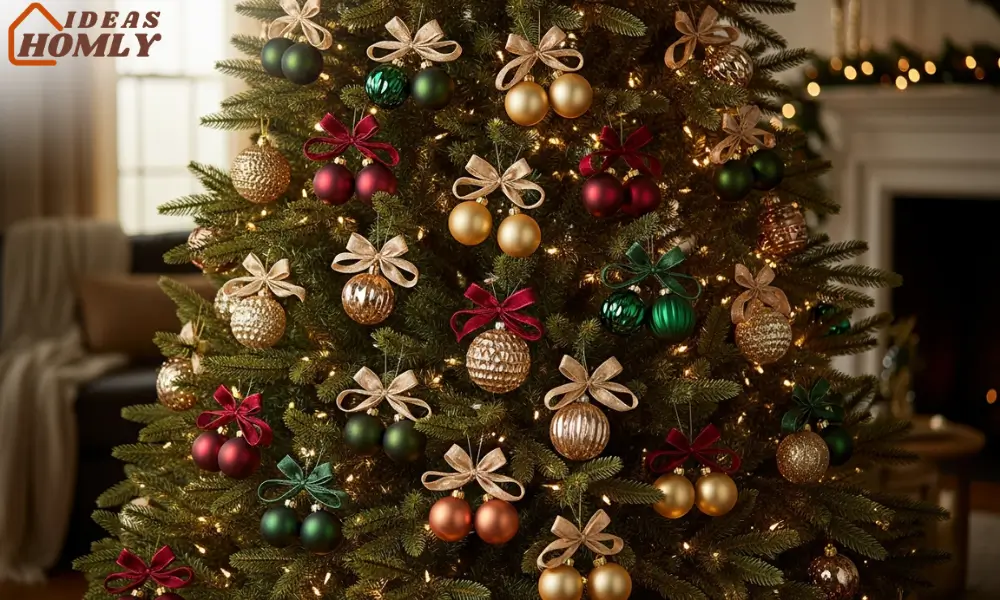
Why Ribbon And Ornament Clusters Look So Professional
Ribbon and ornament clusters always make my tree look intentional. I like using this idea because it fills open spaces quickly and adds visual weight exactly where I need it.
When I cluster ornaments with ribbon loops, the tree instantly gains shape. This method helps even simple trees look decorated with purpose.
I also enjoy this idea because it gives me control over color placement. Instead of scattering ornaments randomly, I anchor them around small ribbon bundles. This makes every cluster feel styled. The clusters also help hide the inner branches, which gives the tree a softer look.
How I Build Balanced Clusters
I start by using short ribbon strips to create small loops. Then I place two or three ornaments in similar colors near the loops. I tuck the cluster into a branch where the tree needs volume.
I repeat the process across the tree but keep the spacing even. I avoid placing too many large clusters near each other because it can throw off the balance.
Best Tips For A Full And Professional Ribbon Tree
Practical Ribbon Tips I Use Every Season
I always fluff the tree before adding ribbon. Full branches give the ribbon better support and help it stay in place. I learned this after struggling with ribbon slipping or losing shape.
I also cut ribbon into manageable strips. Long ribbon pieces look neat in theory, but they often twist or sag. Strips keep everything tidy and easier to control.
I pick two or three ribbon colors that match the room decor. Too many shades create a scattered look. I also prefer wired ribbon because it holds its structure throughout the season. If a ribbon looks stiff in the store, it usually works well on the tree.
Simple Table To Guide Ribbon Choices
| Ribbon Type | Best Use | Look It Creates |
|---|---|---|
| Wired Ribbon | Cascades and loops | Structured and professional |
| Velvet Ribbon | Layered texture | Soft and rich |
| Mesh Ribbon | Volume fillers | Wide and airy |
| Satin Ribbon | Surface details | Smooth and elegant |
Conclusion
A full and professional tree always comes down to ribbon placement, and these ideas helped me improve my trees every year.
The vertical cascade gives height, the diagonal wrap adds structure, and the bow topping technique creates a strong focal point. When I mix textures, the tree gains depth. When I use clusters, the tree fills out beautifully.
Each ribbon idea works on different tree styles, and you can adjust them based on your room design. I like using these methods because they create a polished look without taking hours. Ribbon adds character, connects ornaments, and ties the whole theme together.
FAQs
I usually use at least two rolls for a standard tree. Larger trees need three or more rolls. The amount depends on how dense you want the ribbon placement.
I always place ribbon first. The ribbon sets the shape, and ornaments fit better around the curves. This also prevents the ribbon from knocking ornaments off.
I prefer ribbon between two and four inches wide. Wider ribbons fill space, while thinner ribbons add detail. Mixing the widths creates a balanced design.
Yes, but I keep it to two patterns. I pair one bold pattern with a softer one. This keeps the tree styled without looking cluttered.