If you’ve ever shopped for bird baths and nearly choked on the price tag, you’re not alone. I’ve been there, staring at flimsy plastic bowls pretending to be “garden art.”
That’s when I realized: concrete is where it’s at. Strong, timeless, and surprisingly easy to work with, DIY concrete bird baths are budget-friendly, eye-catching, and tough enough to handle years of weather and winged visitors.
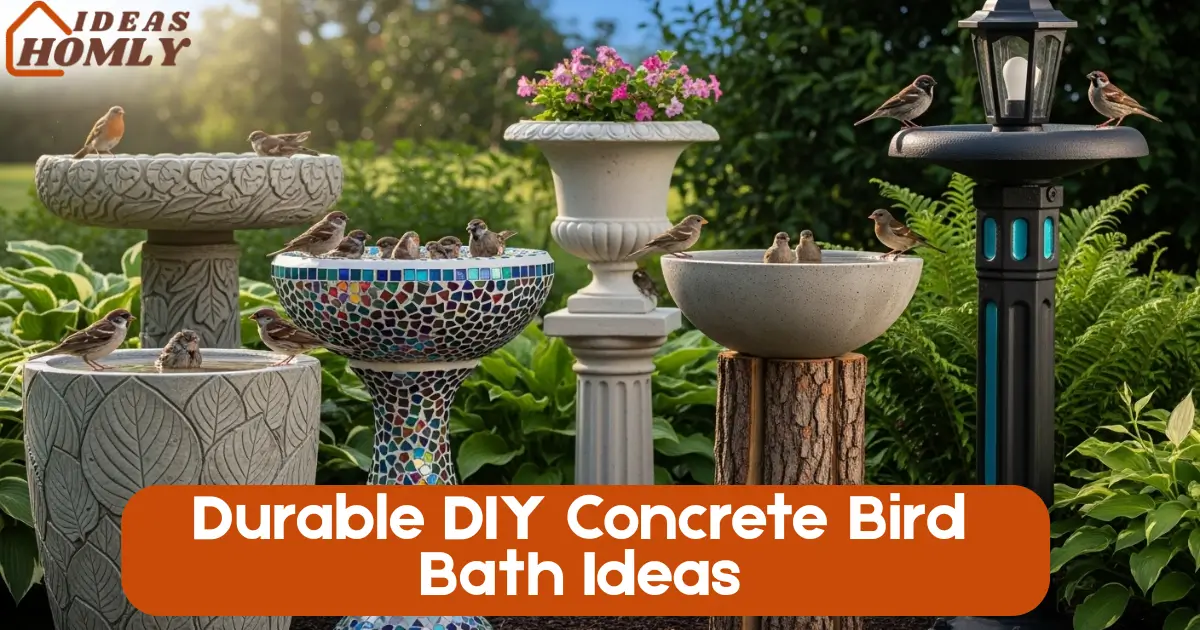
In this guide, I have listed five of my favorite concrete bird bath ideas, each one tested for durability, charm, and simplicity. Whether you want something rustic, elegant, or totally unique, there’s a design here for you.
Why Concrete is Perfect for Bird Baths
Concrete might not sound exciting, but when it comes to bird baths, it’s honestly the MVP. Here’s why:
- Durability: Unlike ceramic or plastic, concrete won’t crack under pressure or under the sun.
- Weatherproof: It holds up against frost, heatwaves, and even those weird spring snowstorms.
- Customizable: You can get creative by molding it, painting it, stamping it and even tiling it.
- Eco-Friendly: No harmful materials. Just sand, cement, water, and a little muscle.
Honestly, once I switched to concrete, I stopped worrying about tipping over bird baths or replacing cracked bowls every season. Concrete stays put and so do the birds.
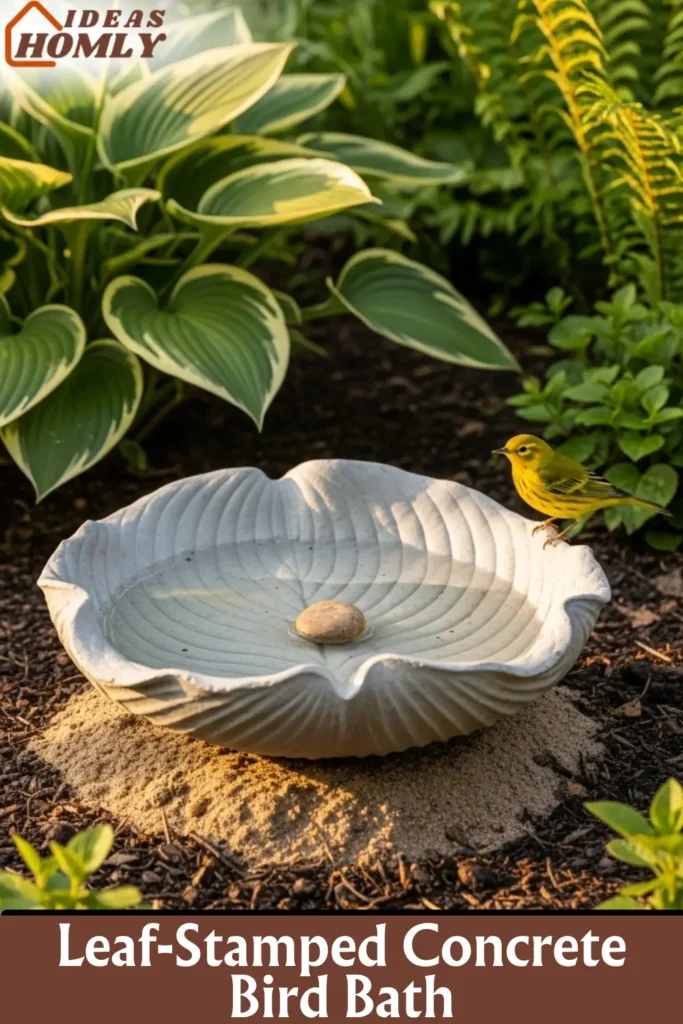
1. Leaf-Stamped Concrete Bird Bath
A natural design with artistic flair!
This is hands-down one of the easiest and most visually stunning bird bath styles I’ve ever tried. If you’ve got a big leaf and a bag of quick-set concrete, you’re halfway there.
What You’ll Need:
| Material | Quantity |
|---|---|
| Large leaf (e.g., rhubarb, hosta, elephant ear) | 1 |
| Quick-set concrete mix | As needed |
| Sand pile (to shape the leaf) | 1 |
| Cooking spray or vegetable oil (for mold release) | Small amount |
| Rubber gloves | 1 pair |
| Trowel or spatula | 1 |
How I Made Mine:
I picked a giant hosta leaf from the garden and placed it face-down on a damp sand mound. That way, the veins would imprint nicely.
Then, I poured a fairly thick concrete mix over the back of the leaf, smoothed it out, and left it to cure for 24-36 hours. After peeling the leaf off (which was so satisfying), I ended up with a natural-looking concrete bowl with beautiful details.
Why It Works:
The leaf shape naturally attracts birds as it’s wide, shallow, and not too deep. Moreover, the texture makes it easier for them to grip.
I also added a small pebble in the center to help butterflies perch. If you love a garden that looks natural but intentional, this one’s a winner.
You can spray your leaf with cooking oil before applying the mix as it makes removing the leaf a breeze.
2. Mosaic Tile Concrete Bowl
Functional art for your garden birds!
If you’ve got broken tiles or colorful pottery you’ve been hoarding (no judgment), this is your chance to shine. This idea brings together crafting and concrete, a match made in garden heaven.
What You’ll Need:
- Concrete bowl mold (I used a large plastic mixing bowl)
- Concrete mix
- Assorted mosaic tiles or broken ceramics
- Waterproof tile adhesive
- Grout
- Grout sealer
- Rubber gloves and sponge
How I Did It:
First, I poured concrete into a large bowl to create the main shape. Once it cured, I popped it out and started arranging my tiles around the outside edges.
I used waterproof adhesive so it wouldn’t fall apart after a few rainstorms. After sticking the tiles, I filled the gaps with grout, wiped off the excess, and sealed everything to keep it weatherproof.
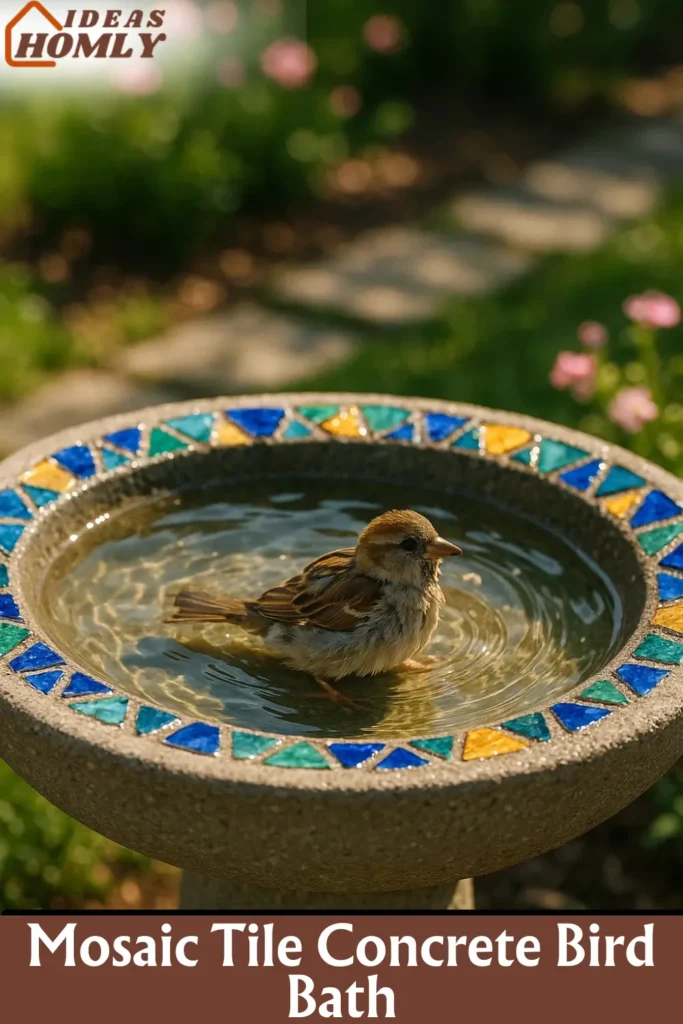
The Result?
An eye-catching bath that doubles as garden art. The birds loved it (obviously), but honestly, I caught more compliments from guests than from the robins.
The little shards of blue, green, and gold tiles sparkled in the sunlight like a glass of bubbly on a summer afternoon.
Maintenance Tip: Reseal every 12-18 months to keep water from getting into the grout.
3. Classical Urn-Style Bath
Old-school charm with DIY simplicity!
If you’re a fan of that timeless, elegant garden look then think English countryside meets DIY weekend then this urn-style concrete bird bath will hit the sweet spot.
Why I Love This Style
It looks expensive. That’s the first reason. But what I really appreciate is the stability and height. Elevating the bowl discourages predators and gives birds a full 360-degree view, which they love.
Moreover, it fits beautifully in formal gardens, next to trimmed hedges, or even tucked between flower beds.
What You’ll Need:
| Item | Use |
|---|---|
| Two-part plastic or fiberglass urn mold | To shape the pedestal |
| Concrete mix | Base + bowl |
| Chicken wire or metal rods | Reinforcement |
| Cooking oil (mold release) | To remove hardened concrete |
| Sandpaper or concrete file | To smooth edges |
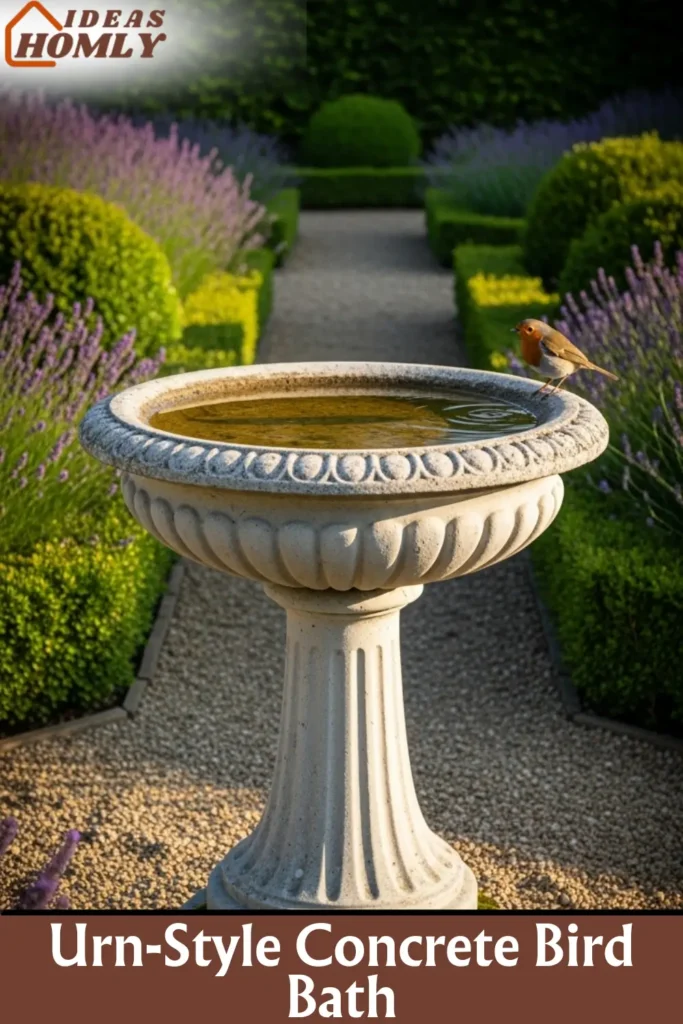
Building It:
I started by prepping my mold with a light coat of oil. Then I mixed a fairly thick concrete batch and poured it in stages, inserting metal rods halfway through to add strength. Once cured (at least 48 hours), I demolded, smoothed out imperfections, and sealed it.
For the top, I used a shallow concrete bowl I’d already made in another mold. After centering it on the pedestal with some landscape adhesive, it looked like something from an upscale catalog. Surprisingly, it cost me less than 25 bucks.
If you want a weathered look then add a little moss slurry (blended moss + yogurt) to the surface and wait a few weeks. Garden wizardry, I tell you.
4. Stacked Log and Concrete Combo
A rugged design for rustic gardens!
This one’s for the folks who love woodland vibes. Imagine the blend of rough timber and raw concrete nestled among your ferns and wildflowers. Yeah, it looks that good.
What’s the Concept?
The base is made of stacked logs, usually in a tripod or teepee shape. The bowl is a classic concrete dish. Together, they form a bird bath that feels like it grew there naturally.
I love placing this near shaded corners of my yard that adds character without being flashy.
Materials I Used:
- Three sturdy logs (about 2-3 feet each)
- Screws or wood brackets for securing
- Leveling wedges or stones
- Precast concrete bowl (or DIY one)
- Optional: moss or bark wraps for aesthetics
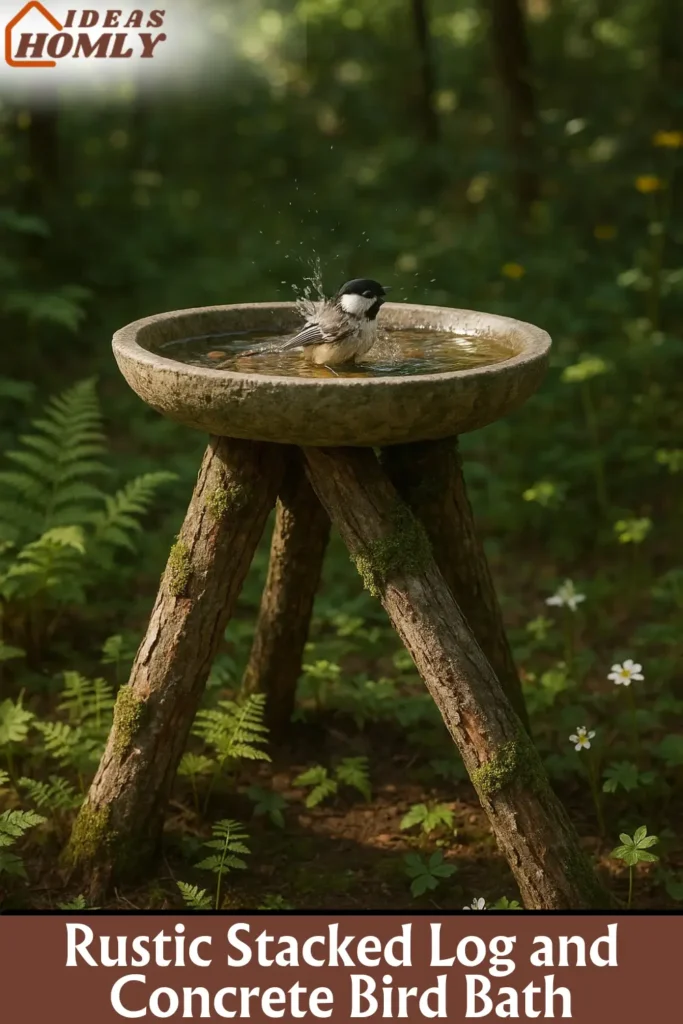
How I Build It:
I arranged the logs in a triangle and used screws to lock them in place where they crossed. Then I set the concrete bowl right on top, nestling it securely with some pebbles underneath to prevent wobbling.
Honestly, it took me less than an hour from start to finish. The hardest part was carrying the concrete bowl without smashing my toes.
Why This One’s a Keeper:
- It blends beautifully into natural settings
- You can make it as tall or low as you want
- The logs are easy to replace if they wear down
This works best in semi-shade near trees. Birds love the added cover.
5. Reclaimed Lamp Post Concrete Bath
Giving forgotten junk a second life!
This was one of my most satisfying upcycle projects ever. An old, rusty lamp post was lying in my shed, and instead of dumping it, I turned it into a chic pedestal bird bath.
What You’ll Need:
| Material | Purpose |
|---|---|
| Old metal or wooden lamp post | Sturdy base |
| Concrete mix | To cast the bowl |
| Epoxy adhesive or concrete screws | To attach bowl |
| Spray paint (optional) | For aesthetics |
How I Made It Work:
First, I cut the lamp post to the height I wanted. Then I cleaned it up with a wire brush and primed it for paint. For the bowl, I poured a shallow, wide concrete form.
Once both pieces were ready, I mounted the bowl on top using heavy-duty adhesive and some reinforcement brackets underneath.
You can also fill the post with sand or gravel for extra stability. That way, wind or rowdy squirrels won’t knock it over.
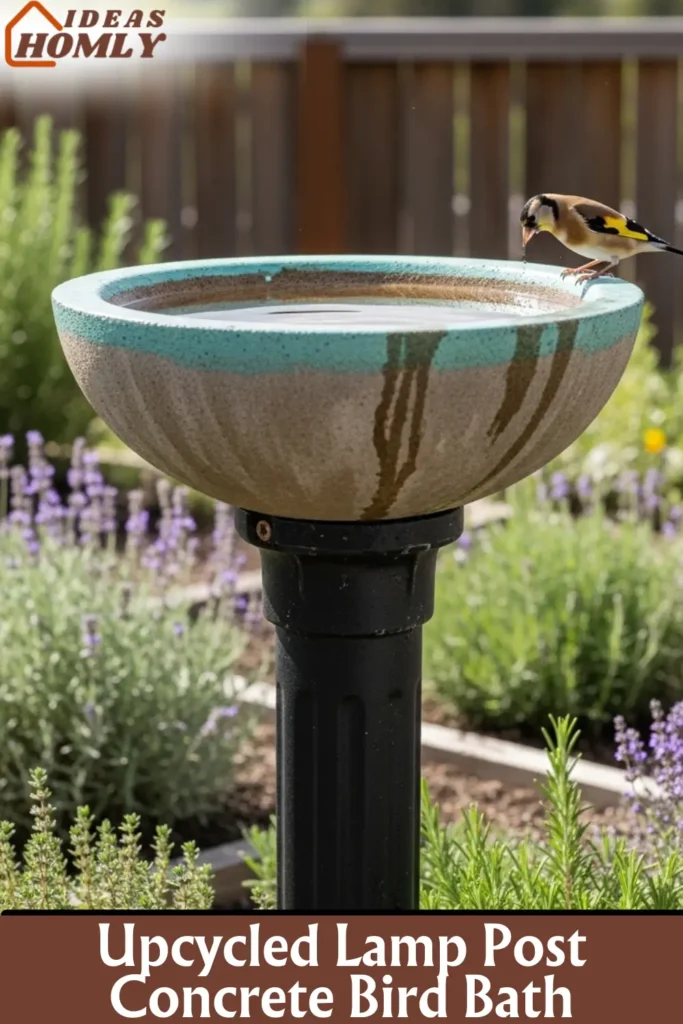
The Charm Factor:
It’s rustic, unique, and zero-waste. You get that satisfaction of turning trash into treasure and the birds don’t seem to mind the industrial chic style either.
Bonus Tip: I painted mine matte black with a pop of teal around the rim. It looks fantastic next to my herb garden.
Care Tips for Concrete Bird Baths
Because even tough stuff needs TLC!
Sure, concrete bird baths are built to last but they’re not totally maintenance-free. I’ve learned (sometimes the hard way) that a little routine care keeps your bird bath looking great and prevents algae or cracking.
Basic Cleaning
I try to clean mine once a week more often in the summer when birds are more active (and messier).
Here’s my top cleaning method:
- Dump out old water (avoid dumping it on your plants if algae is present).
- Scrub the surface with a stiff brush. No need to go gentle.
- Mix a 1:10 bleach solution (1 part bleach to 10 parts water), and rinse thoroughly after scrubbing.
- Refill with fresh water and enjoy the birds arguing over who gets the first dip.
Tip: Never use soap or detergent. It leaves residue that harms birds.
Winter Preparation
If you live somewhere cold like I do, freezing water is your worst enemy. Here’s what I do before the frost hits:
- Empty the bath completely.
- Store it upside down in a shed or cover it with a tarp.
- For permanent baths, I add a de-icer to prevent cracking.
Some folks leave them out year-round, but I’d rather be cautious than replace cracked concrete come spring.
Conclusion
So there you have five solid, stylish, and downright fun DIY concrete bird bath ideas that won’t break the bank or your back.
Whether you’re crafting a mosaic masterpiece or turning a forgotten lamp post into garden gold, there’s something incredibly satisfying about building your own backyard haven for birds.
Each project is unique, but they all share three things: durability, personality, and purpose.
And the best part is that these baths don’t just attract birds but they attract compliments too.
If you’re like me and find joy in watching a sparrow splash around while sipping your morning coffee, go ahead and pick one of these ideas to start. Your garden (and the birds) will thank you.
FAQs
Most birds prefer shallow water. So aim for a depth of 1 to 2 inches at the center. If the bowl is deeper, add pebbles or a flat rock so they have a safe perch.
For bird baths, I always use quick-set or all-purpose concrete mix. It’s strong, affordable, and sets in a few hours. Avoid anything labeled “lightweight” or “decorative” unless reinforced.
You should clean it weekly, place it in partial shade, and avoid letting water sit too long. Adding a few drops of apple cider vinegar (no more than 1 tsp per gallon) helps without harming birds.
Absolutely! Just use non-toxic, weather-resistant paint. For extra durability, apply a concrete sealer every 12-18 months. I’ve also used mosaic tiles and pebbles for a natural or colorful look.