
DIY Christmas ornaments always give the tree a warm and personal touch. I love how simple materials can turn into decorations that feel special.
These homemade ornaments help me save money and add a creative look to the holiday setup. I also enjoy the small moments of crafting because they make the season feel calmer.
When I make ornaments at home, I feel more connected to the season. Every piece I create feels unique and meaningful. If you want affordable and easy craft ideas that look store bought, these ornament ideas work perfectly. Each one uses supplies you can find at home or buy easily.
Why These Ornament Ideas Are Trending This Season
Handmade ornaments remain popular because people want simple, budget-friendly decor options. Many want natural textures, warm colors, and something they can personalize. I see the trend growing every year because it aligns with minimal, cozy, and family-oriented Christmas themes.
DIY ornament ideas also trend because people enjoy creative breaks during the holidays. Most of these designs use materials like clear balls, dried fruit, wooden beads, and fabric scraps.
These items give a rustic style that works well with modern and farmhouse Christmas trees. I like these because they look beautiful without requiring advanced crafting skills.
1. Clear Fillable Ornaments
Clear fillable ornaments always give me endless ways to personalize my tree. I love how these transparent balls allow me to change themes every year. They work well whether I want a modern, rustic, or colorful look. The best part is the freedom to choose fillers that match my style.
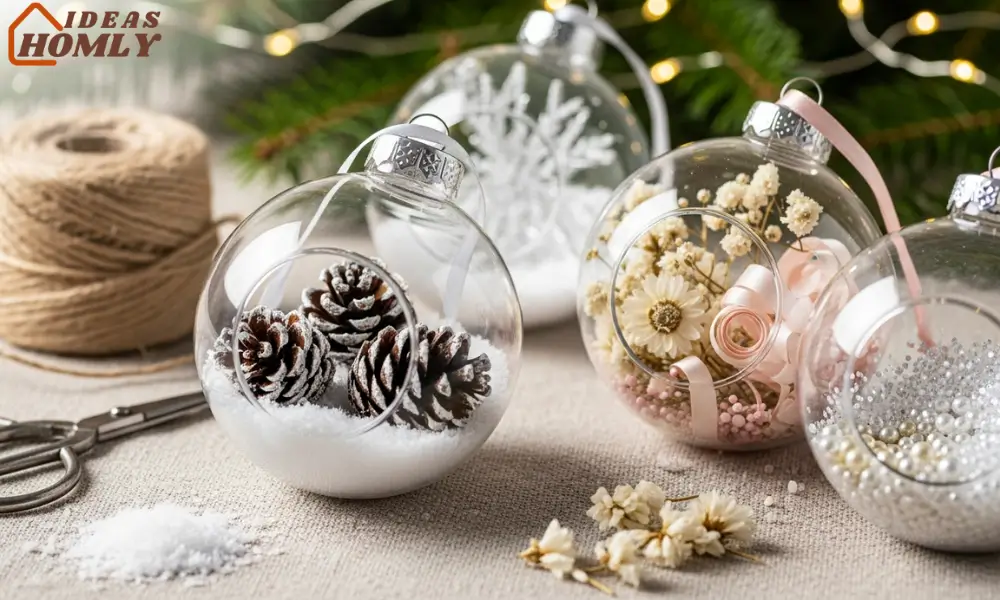
I usually fill these ornaments with mini pinecones, artificial snow, or ribbon curls. Small beads, glitter, feathers, and even tiny photos also fit inside.
I find this idea helpful when I want quick ornaments that still look professional. I also like using dried flowers because they create a soft winter look.
Quick Fill Ideas
| Fill Idea | Style | Difficulty |
|---|---|---|
| Faux snow | Minimal winter look | Very easy |
| Mini pinecones | Rustic, natural | Easy |
| Ribbon curls | Colorful and fun | Easy |
| Dried flowers | Soft, romantic | Easy |
| Small beads | Modern and shiny | Easy |
I like keeping a small box of fillers so I can switch designs whenever I want. These ornaments also work great for gifting because you can personalize each one. If someone prefers a specific color theme, I can match it instantly.
2. Dried Orange Slice Ornaments
Dried orange slice ornaments always remind me of classic Christmas markets. The sweet citrus scent fills the room, and it adds a warm touch to the tree. I enjoy making these because they look beautiful without costing much. They also match natural and farmhouse-themed Christmas trees.
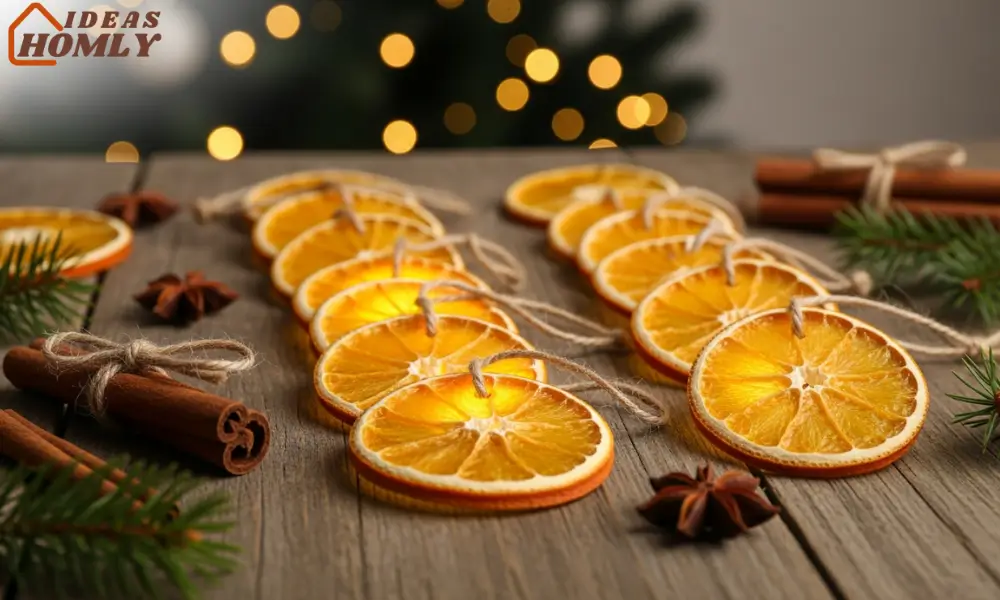
When I prepare these oranges, I slice them thin so they dry evenly. I place them on a baking rack and let them dry on low heat until they turn translucent.
I like pairing them with twine, cinnamon sticks, star anise, or rustic ribbon for a complete look. The warm orange color looks great next to green branches.
I often make extra slices to use in garlands or gift wrapping. People always notice them because they feel natural and charming. These ornaments also last a long time when dried properly. I store them in airtight containers to keep them fresh for the next season.
3. Wooden Bead Ornaments
Wooden bead ornaments give a clean and modern look to my tree. I like them because they blend with many styles including Scandinavian, neutral, and farmhouse themes.
The natural wood tone always brings a calm and cozy feel to the holiday setup. These ornaments also pair well with greenery and simple lights.
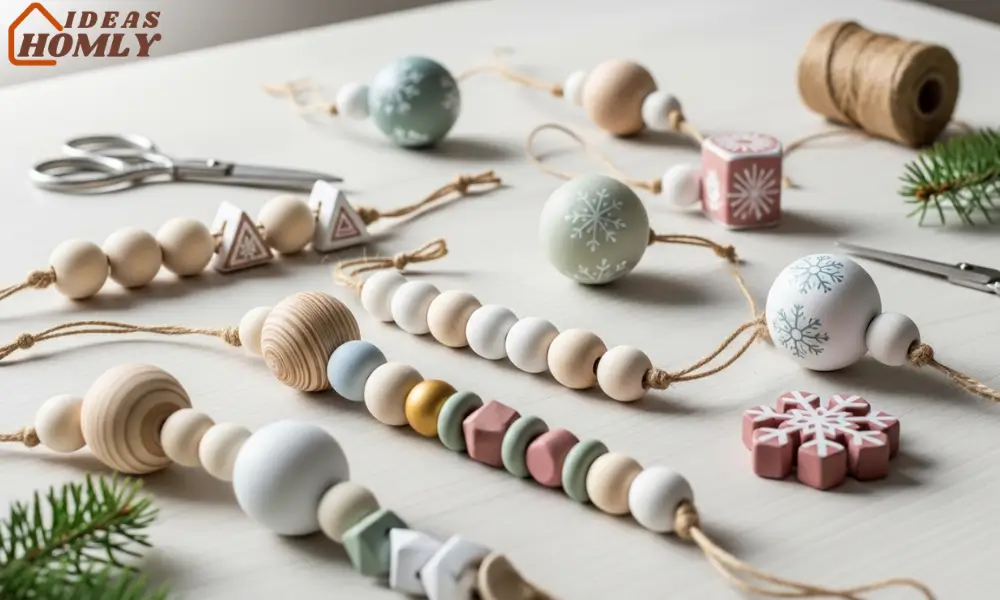
I usually string the beads onto twine in different sizes to create patterns. Sometimes I create geometric shapes, while other times I form snowflake inspired designs. I also enjoy painting a few beads in soft colors like white, gold, or muted pastels. It adds a subtle decorative touch without going overboard.
These ornaments stay durable and lightweight which makes them easy to hang. I also like using wooden bead designs for garlands or gift tags. The materials are affordable and easy to find which makes this one of my go to Christmas crafts.
4. Ribbon Scrap Ornaments
Ribbon scrap ornaments help me use leftover pieces from other projects. I like them because they feel playful and colorful. These ornaments add texture and a handmade charm to the tree. Even small ribbon pieces work well which makes this idea budget-friendly.
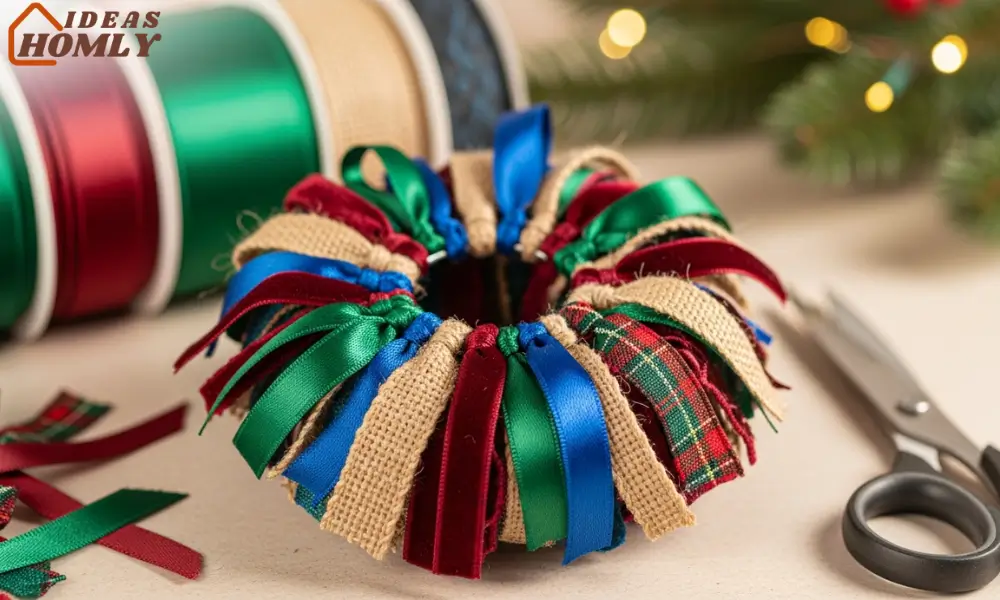
I usually cut ribbons into equal lengths and tie them around a small wire ring or a stick. Mixing satin, burlap, velvet, and plaid ribbons creates a fuller look.
I love how the mix of textures gives a soft and festive style. The ornament shape ends up looking like a mini tassel or tiny wreath depending on the method.
I also enjoy coordinating ribbon colors with my overall theme. If I want a classic look, I choose red, green, and gold combinations. For a neutral tree, I use whites, creams, and beiges. These ribbon ornaments sit well on the tree because they add movement and color.
5. Cinnamon Stick Star Ornaments
Cinnamon stick star ornaments give a rustic touch that feels warm and homey. I like the natural scent they bring to the tree. These ornaments match farmhouse and cottage-style Christmas decor beautifully. They also add a handcrafted look without feeling complicated.
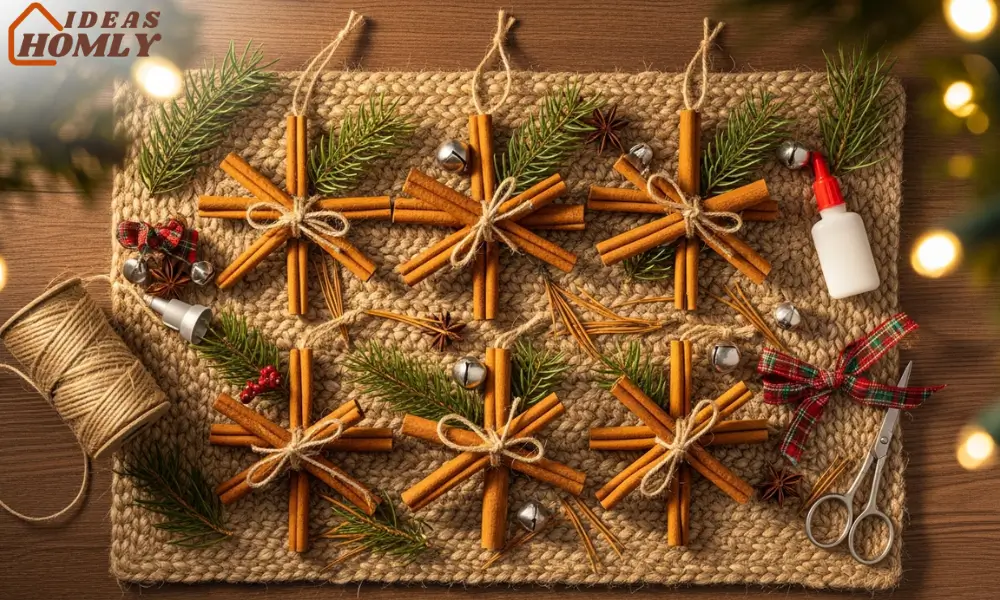
I arrange five small cinnamon sticks in a star shape and tie the corners with twine. Sometimes I add small accents like dried greenery, tiny bells, or ribbon pieces.
The star shape looks simple, yet it stands out nicely on the tree. I also enjoy placing these on garlands or attaching them to gift wraps.
These ornaments stay sturdy and can be reused every year when stored properly. I keep them in a cool place to maintain the scent. This ornament idea always gets compliments because it looks natural and intentional.
Best Tips For DIY Christmas Ornaments
I always keep a small craft box ready during the holidays. It helps me work faster when inspiration strikes. You can follow these tips to make your ornament crafting easier.
Helpful Crafting Tips
- Choose materials that match your theme so everything looks coordinated.
- Prepare supplies like glue, scissors, and twine before starting.
- Test one ornament first before making a larger batch.
- Store finished ornaments in sturdy boxes to protect them.
- Use clear labels on storage boxes for easy access next season.
Conclusion
DIY Christmas ornaments make the tree feel personal, warm, and meaningful. I enjoy the process because every ornament tells a small story. These ideas stay easy, affordable, and beginner-friendly.
Each one brings a different style, whether you prefer natural, colorful, or minimal decor. I also love the way the tree looks when it holds a mix of homemade pieces.
When I create ornaments with simple materials, the holiday season feels calmer. These crafts help me take short breaks from the busy schedule. They also make my tree look unique without spending a lot.
If you want decorations that feel special and look good in any home, these ideas work perfectly. Every ornament here uses materials you can find easily which makes the whole experience smooth.
I also like how these designs match different Christmas color palettes. Whether someone prefers warm rustic tones or cooler modern styles, these ornament ideas adapt well.
When readers look for easy DIY decorations, they want clear steps, realistic ideas, and options that look great on the tree. That is exactly what these crafts offer.
FAQs
Homemade ornaments last for many years when stored properly. I keep them in sturdy boxes to protect them from moisture and heat. Natural ornaments like dried oranges last one to three years when dried completely.
Most ornaments need basic supplies like twine, glue, scissors, and simple decorative pieces. I also keep clear fillable balls, wooden beads, and ribbons on hand. These items make crafting easier during the holiday season.
Kids enjoy these projects because the steps stay simple. I only supervise when using scissors or hot glue. The rest of the process stays safe and fun for them.
I store each ornament style in separate containers. I wrap them lightly in tissue paper so they don’t break or lose shape. Keeping them in a cool and dry place helps them last longer.